> ## Documentation Index
> Fetch the complete documentation index at: https://helpcenter.recotap.com/llms.txt
> Use this file to discover all available pages before exploring further.
# Create Ads
> Create, customize, activate, edit, and clone ads in Recotap.
export const SupademoEmbed = ({src, title = "Watch interactive guide"}) => {
const [show, setShow] = useState(false);
if (!show) {
return
;
}
return ;
};
## Steps to Access Ads Dashboard
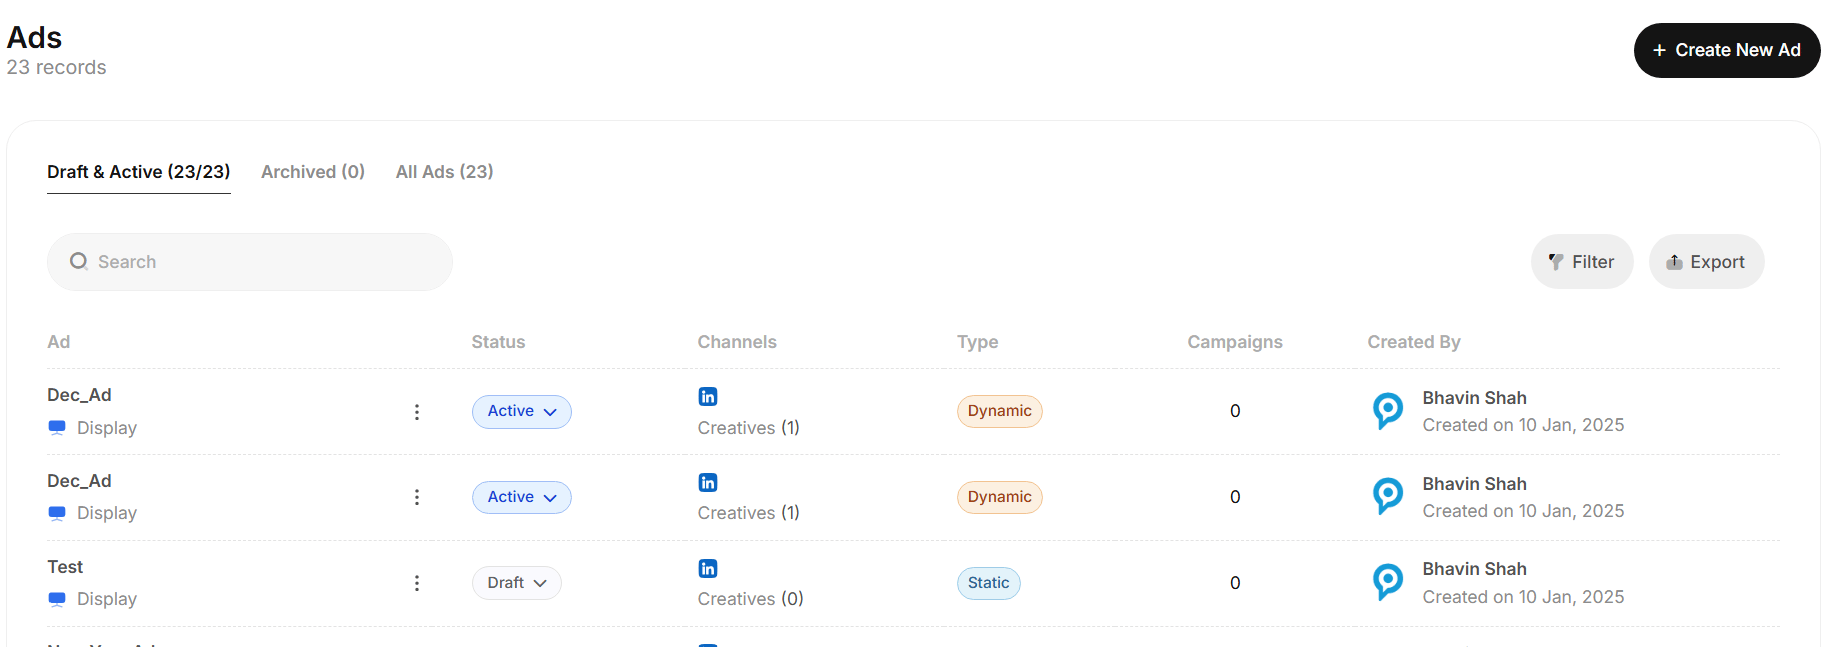
The **Ads Dashboard** helps you manage, filter, and monitor all ad assets within your ABM tool.
Here’s a breakdown of the dashboard's key components and functionalities:
### Dashboard Overview
* **Draft & Active Ads**: This tab displays all ads that are currently in the *draft* or *active* state.
* **Archived Ads**: Ads that are no longer in use and have been archived.
* **All Ads**: This tab consolidates all ads across *active*, *draft*, and *archived* states.
### Main Features
1. **Filters**
* You can filter ads based on:
* **User**: Select the user who created or manages the ad.
* **Created Date**: Set a date range for when ads were created.
* **Status**: Filter ads by their state – *Draft*, *Active*, or *Archived*.
* **Format**: Choose the ad format, such as *Static* or *Dynamic*.
* **Ad Type**: Classify ads based on their purpose (e.g., display, video).
**Actions**:
* **Apply Filter**: View filtered ads based on selected criteria.
* **Reset**: Clear all filters.
2. **Ad List Table** This section lists all the ads in an organized table format with the following columns:
| Column | Description |
| ---------- | ---------------------------------------------------------------------------------------------------------------- |
| Ad | The name of the ad. Can be edited or cloned using the respective options by clicking on the 3 dots against them. |
| Status | The current state of the ad: Draft, Active, or Archived. You can change this. |
| Channels | Shows the platforms the ad is set to run on (e.g., LinkedIn) |
| Type | Specifies if the ad is Static (fixed content) or Dynamic. |
| Campaigns | Indicates the no. of campaigns linked to the ad. |
| Created By | Displays the creator’s name & the date the ad was created. |
**Actions for Ads**:
* Use the drop-down in the *Status* column to change the ad's state:
* **Active**: Ready to get attached to a campaign.
* **Archive**: Move the ad to the archived list.
**Additional Actions**
* **Search**: Quickly search ads by name.
* **Export**: Export the ad data for reporting or further analysis.
* **Create New Ad**: Start creating a new ad with the “+ Create New Ad” button.
## Methods to Create Ads
You can follow these steps to create and configure your ad campaigns seamlessly.
## Step 1: Start Creating an Ad
1. **Access the Ads Dashboard**:
* Navigate to the Ad Campaigns >> Ads section and click on the **"Create New Ad"** button at the top right.
2. **Fill in the Ad Details**:
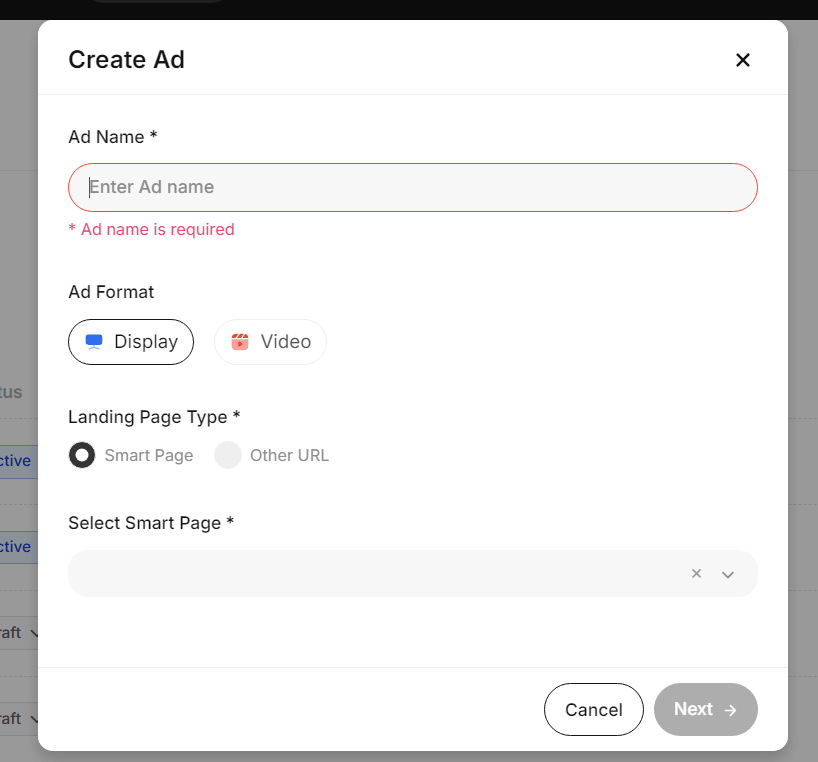
* **Ad Name**: Enter a descriptive name for the ad. (Required)
* **Ad Format**: Choose between:
* **Display**: For image-based ads.
* **Video**: For video-based ads.
* **Landing Page Type**: Select where your ad will redirect users:
* **Smart Page**: Personalized Landing Page link which will be pre-configured within the platform.
* **Other URL**: An external URL.
* If selecting **Smart Page**, use the drop-down menu to select the desired page.
3. **Proceed**: Click **Next** to move to the configuration stage.
## Step 2: Configure Your Ad
### **Creative Options**:
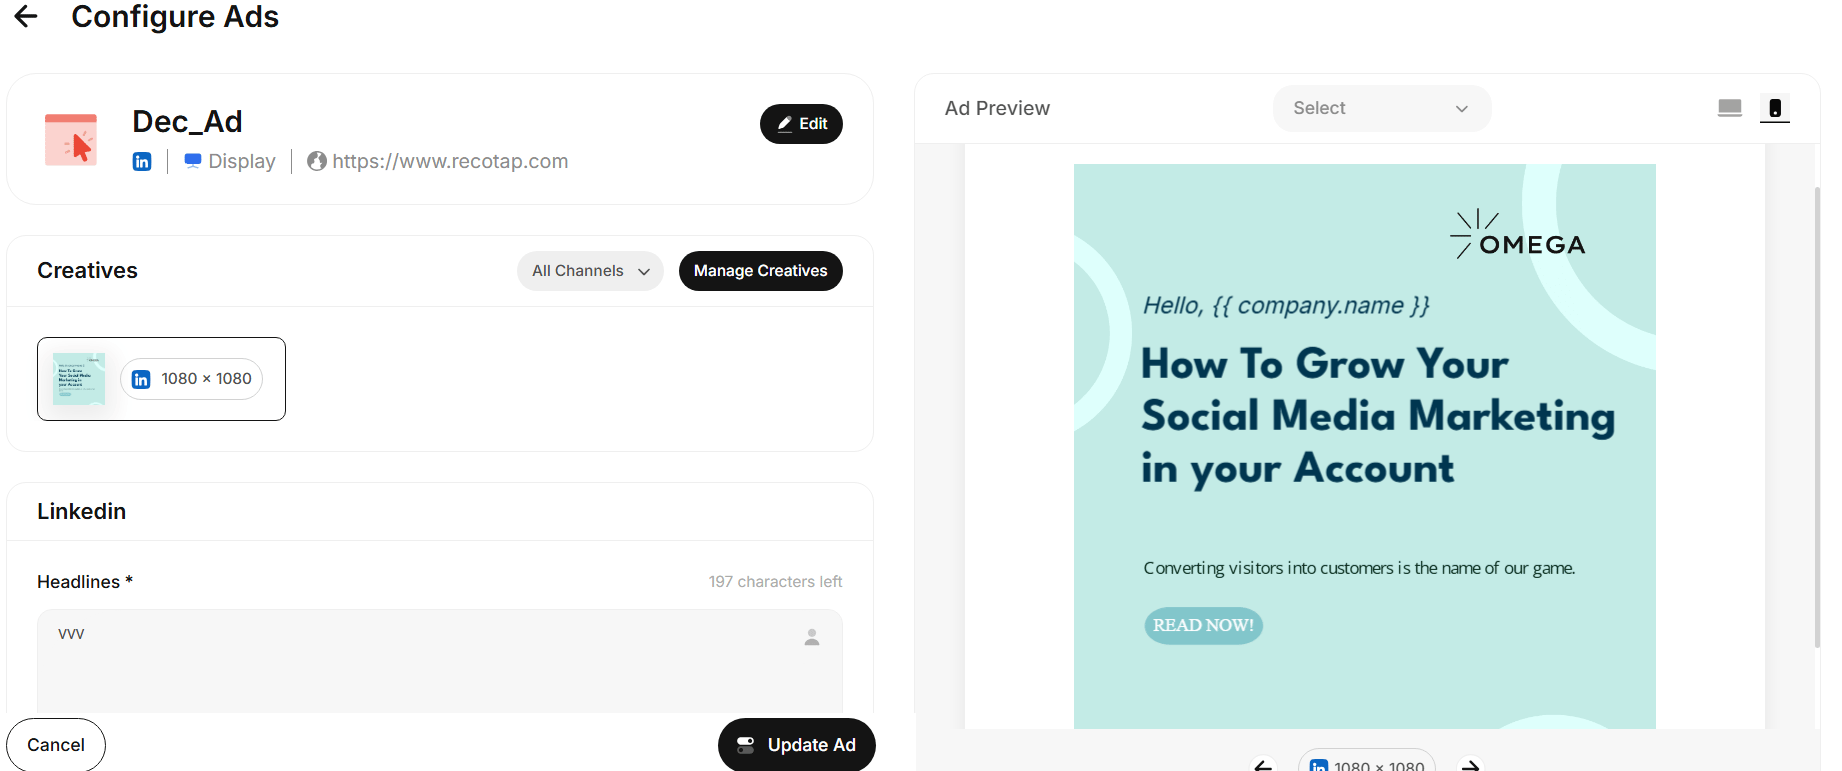
1. **Upload Static Creatives**: Click the **Upload** button to add ad assets.
> Follow this quick interactive guide on uploading Static Ads
* Supported Formats: Images in dimensions like 1080x1080 (mandatory), 1200x628, 600x900, 628x1200 & 720x900. Video dimensions would be 1200x1200 (mandatory), 1920x1080
* Bulk upload options are available for display ads. Ensure the .zip file contains only the supported file types (PNG, JPG, GIF, JPEG).
* If a creative for a specific dimension already exists, uploading a new one will replace the existing file.
### **Build Using Template**: Use built-in templates to design your ad assets.
Follow this quick interactive guide on Creating Ads using Built in Templates:
* Browse the available templates after choosing "Build Using Template". Each template is labeled, showing a preview to help you decide which one fits your campaign's tone and style.
* Select your preferred template and click "Next."
* Once the template is loaded, you'll enter the customization view.
* Adjust the **background image** by uploading or editing it as per your branding needs.
* Modify the **logo** to reflect your organization's branding by uploading your own.
* Edit any **graphic elements** included in the template to align with the campaign's theme. To use graphics, choose a template having graphic placement.
* Modify the pre-set texts in the template.
* Adjust **text color** using the color palette provided.
* Set your CTA text, such as "Learn More" or "Read More."
* Customize the **button background color** and **button text color** to match your brand guidelines or make the CTA visually appealing.
* The right panel shows a live **preview** of the ad as you make edits, ensuring you can see how the final design will appear.
* Navigate through different templates if needed using the navigation buttons.
* Once satisfied with the customization, click "Done."
* You’ll be redirected to the main ad configuration page, where you can save the ad as a draft or activate it for your campaign.
* You can click on “Manage Creatives” if you wish to re-customize the template.
1. **Add Ad Content**:
1. **Headline**: Enter an engaging headline (200 characters max).
2. **Introductory Text**: Add the main ad copy (600 characters max).
3. **Description**: Provide additional information about the ad (optional, 300 characters max).
2. **Set Call to Action (CTA)**:
1. Select a CTA from the available options (e.g., *Learn More*, *Sign Up*).
3. **Add Destination URL**:
1. Enter the URL where users will be redirected upon clicking the ad.
2. Optionally, append UTM parameters for campaign tracking.
4. **Preview Ad**:
1. Use the **Ad Preview** section to see how your ad will look on desktop and mobile devices.
## Step 3: Save or Activate Ad
1. **Save Draft**: If the ad is incomplete, save it as a draft for later edits.
2. **Activate**: Click **Activate** if all are set.
## Steps to Edit and Clone Ads
## **Edit Ad**
1. **Access the Edit Option**:
* Locate the ad you wish to edit in the Ads dashboard.
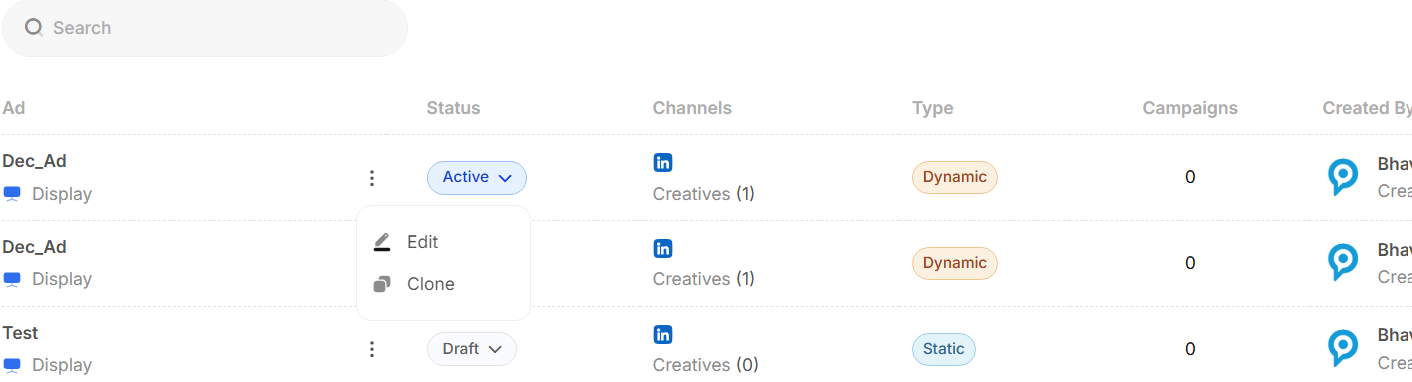
* Click on the three-dot menu (⋮) beside the ad name.
* Select **Edit** from the dropdown menu to update any of the fields.
* Save Changes.
## **Clone Ad**
1. **Access the Clone Option**:
* Click the three-dot menu (⋮) beside the ad you want to replicate.
* Select **Clone** from the dropdown menu.
2. **What Happens When You Clone**:
* A new ad copy is created with identical settings, content, and creatives from the original ad.
* The cloned ad appears in the dashboard as a **Draft**, allowing you to modify it before activation.
3. **Why Use Cloning**:
* **For A/B Testing**: Create variations of an ad (e.g., change headlines or creatives) to test performance.
* **For Similar Campaigns:** Duplicate ads for different target audiences or platforms without starting from scratch.
 ## Methods to Create Ads
You can follow these steps to create and configure your ad campaigns seamlessly.
## Step 1: Start Creating an Ad
1. **Access the Ads Dashboard**:
* Navigate to the Ad Campaigns >> Ads section and click on the **"Create New Ad"** button at the top right.
2. **Fill in the Ad Details**:
* **Ad Name**: Enter a descriptive name for the ad. (Required)
* **Ad Format**: Choose between:
* **Display**: For image-based ads.
* **Video**: For video-based ads.
* **Landing Page Type**: Select where your ad will redirect users:
* **Smart Page**: Personalized Landing Page link which will be pre-configured within the platform.
* **Other URL**: An external URL.
* If selecting **Smart Page**, use the drop-down menu to select the desired page.
3. **Proceed**: Click **Next** to move to the configuration stage.
## Methods to Create Ads
You can follow these steps to create and configure your ad campaigns seamlessly.
## Step 1: Start Creating an Ad
1. **Access the Ads Dashboard**:
* Navigate to the Ad Campaigns >> Ads section and click on the **"Create New Ad"** button at the top right.
2. **Fill in the Ad Details**:
* **Ad Name**: Enter a descriptive name for the ad. (Required)
* **Ad Format**: Choose between:
* **Display**: For image-based ads.
* **Video**: For video-based ads.
* **Landing Page Type**: Select where your ad will redirect users:
* **Smart Page**: Personalized Landing Page link which will be pre-configured within the platform.
* **Other URL**: An external URL.
* If selecting **Smart Page**, use the drop-down menu to select the desired page.
3. **Proceed**: Click **Next** to move to the configuration stage.
 ## Step 2: Configure Your Ad
### **Creative Options**:
1. **Upload Static Creatives**: Click the **Upload** button to add ad assets.
> Follow this quick interactive guide on uploading Static Ads
## Step 2: Configure Your Ad
### **Creative Options**:
1. **Upload Static Creatives**: Click the **Upload** button to add ad assets.
> Follow this quick interactive guide on uploading Static Ads
 ## Step 3: Save or Activate Ad
1. **Save Draft**: If the ad is incomplete, save it as a draft for later edits.
2. **Activate**: Click **Activate** if all are set.
## Steps to Edit and Clone Ads
## **Edit Ad**
1. **Access the Edit Option**:
* Locate the ad you wish to edit in the Ads dashboard.
* Click on the three-dot menu (⋮) beside the ad name.
* Select **Edit** from the dropdown menu to update any of the fields.
* Save Changes.
## Step 3: Save or Activate Ad
1. **Save Draft**: If the ad is incomplete, save it as a draft for later edits.
2. **Activate**: Click **Activate** if all are set.
## Steps to Edit and Clone Ads
## **Edit Ad**
1. **Access the Edit Option**:
* Locate the ad you wish to edit in the Ads dashboard.
* Click on the three-dot menu (⋮) beside the ad name.
* Select **Edit** from the dropdown menu to update any of the fields.
* Save Changes.
 ## **Clone Ad**
1. **Access the Clone Option**:
* Click the three-dot menu (⋮) beside the ad you want to replicate.
* Select **Clone** from the dropdown menu.
2. **What Happens When You Clone**:
* A new ad copy is created with identical settings, content, and creatives from the original ad.
* The cloned ad appears in the dashboard as a **Draft**, allowing you to modify it before activation.
3. **Why Use Cloning**:
* **For A/B Testing**: Create variations of an ad (e.g., change headlines or creatives) to test performance.
* **For Similar Campaigns:** Duplicate ads for different target audiences or platforms without starting from scratch.
## **Clone Ad**
1. **Access the Clone Option**:
* Click the three-dot menu (⋮) beside the ad you want to replicate.
* Select **Clone** from the dropdown menu.
2. **What Happens When You Clone**:
* A new ad copy is created with identical settings, content, and creatives from the original ad.
* The cloned ad appears in the dashboard as a **Draft**, allowing you to modify it before activation.
3. **Why Use Cloning**:
* **For A/B Testing**: Create variations of an ad (e.g., change headlines or creatives) to test performance.
* **For Similar Campaigns:** Duplicate ads for different target audiences or platforms without starting from scratch.