> ## Documentation Index
> Fetch the complete documentation index at: https://helpcenter.recotap.com/llms.txt
> Use this file to discover all available pages before exploring further.
# Create Smart Pages
> Build personalized landing pages using account-level dynamic content.
export const SupademoEmbed = ({src, title = "Watch interactive guide"}) => {
const [show, setShow] = useState(false);
if (!show) {
return
;
}
return ;
};
## Creating a Smart Page
Watch a quick video guide on how to create personalized landing pages in minutes.
## **1. Accessing Smart Pages**
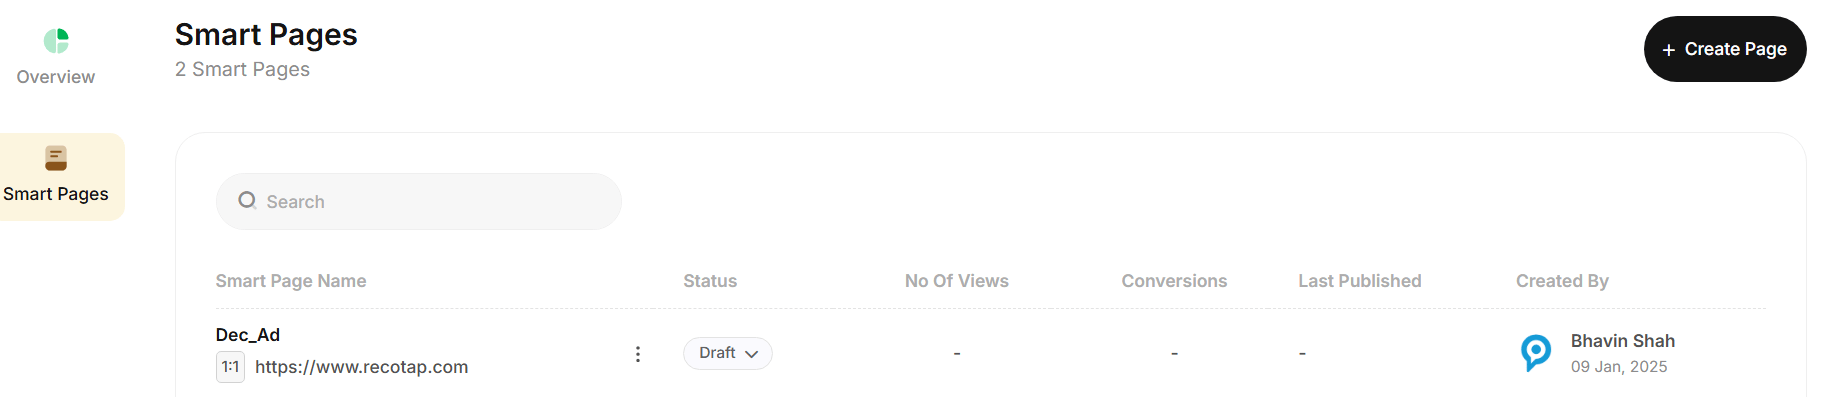
* Navigate to the **Smart Pages** section in the Recotap platform.
* On the Overview page, view the performance metrics of previously created Smart Pages.
* Use the sidebar’s **Smart Pages** tab to view, manage, and create pages, which includes:
* Name
* Status (Active/Draft)
* Views
* Conversions
* Last Published Date
* Creator's Name
## **2. Creating a Smart Page**
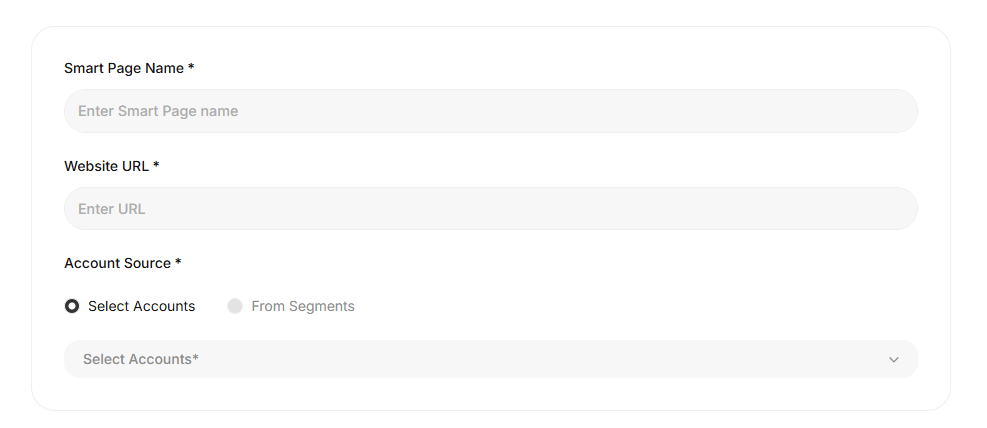
* Click **Create Page** to begin.
* Fill in the required details:
* **Smart Page Name**: A descriptive name for easy identification.
* **Website URL**: Specify the URL where the Smart Page will be hosted.
* **Account Source**: Select accounts manually or from predefined segments.
## **3. Adding Personalization Content**
Enrich each target account with personalized data.
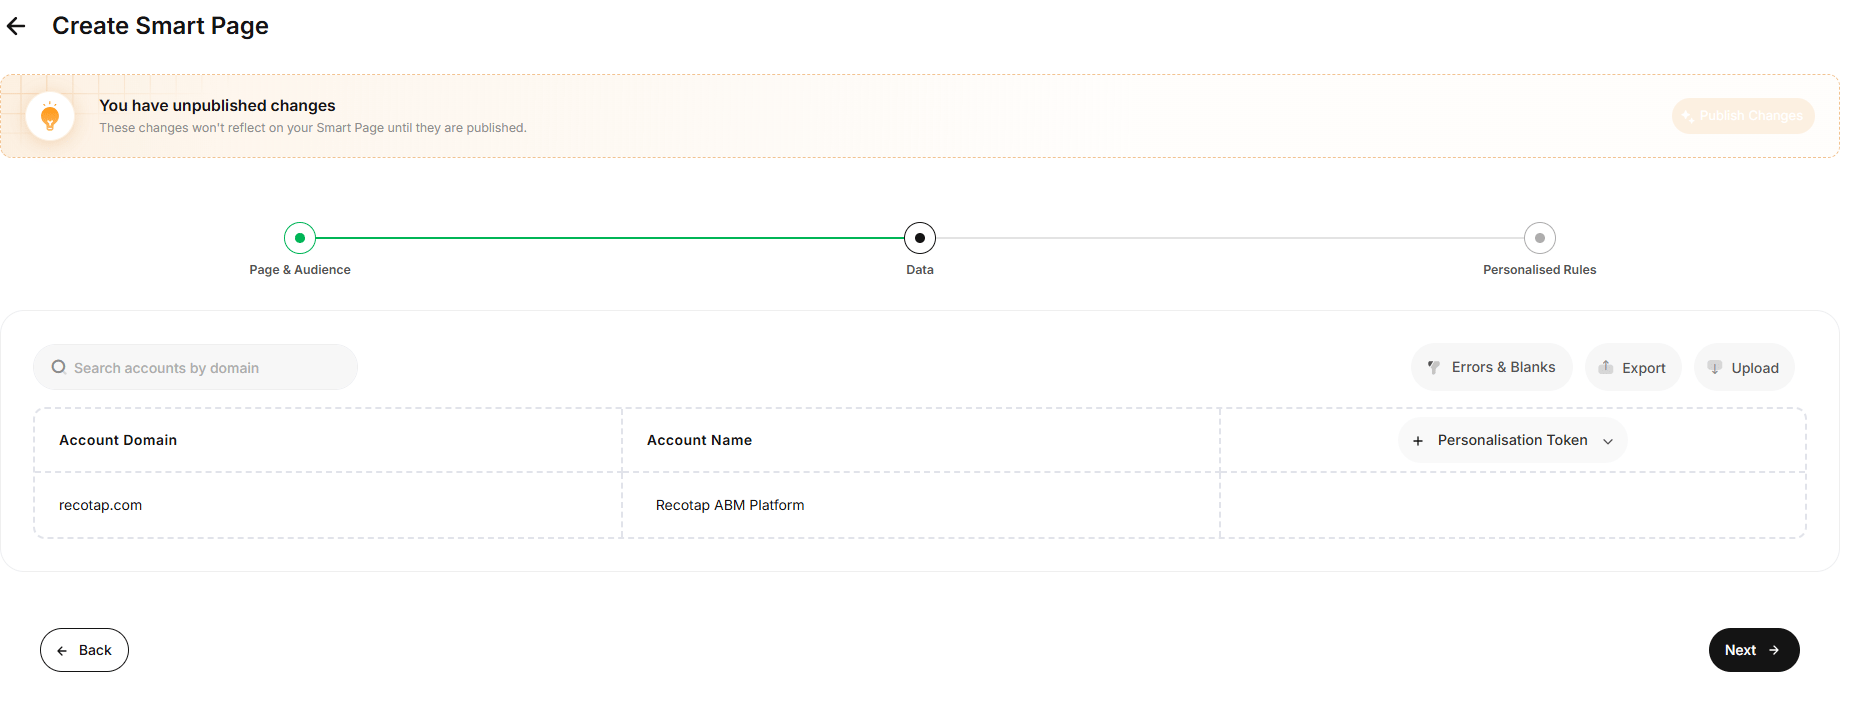
* Use the **Personalisation Token** dropdown to add the columns you want -such as *Industry, Use Case, Persona, Custom Message, Header Text,* and more.
* Every column you add becomes a variable that can be inserted into your Smart Page content.
* You can fill these values manually, **upload a CSV**, or use **Errors & Blanks** to quickly spot missing data before publishing.
* Once all required fields are added and populated, click **Next** to move to Personalised Rules.
🖼️ Adding Images, Videos, and External Links
Personalising media assets requires a small but important setup on your Smart Page.
**1. Ensure Placeholders Exist on your Default Landing Page**
To personalize **images, videos, or links**, your default Page must already contain placeholder components such as:
* Image placeholder (banner, case study tile, logos, etc.)
* Video placeholder (intro/demo section)
* Hyperlink placeholder (CTA buttons, resource links)
Recotap will only swap content into **existing blocks** - it cannot inject new components automatically.
**2. Uploading Images or Videos**
If you're using variables like **Case Study Image**, **Custom Banner**, or **Intro Video**, follow these steps:
* Upload the media file to your **website’s hosting server**, **CMS**, or **CDN** (where your site normally stores images or videos).
* Copy the public URL of the media asset.
* Paste the URL into the respective column in your personalisation data table.
Recotap will fetch and render the asset dynamically using this URL.
**3. Adding CTA or Resource Links**
For CTA buttons or personalised hyperlinks, simply enter the full URL in this format: [https://www.example.com](https://www.example.com/)
These links will automatically be inserted into the corresponding CTA placeholder on the Smart Page.
## **4. Smart Page Designer**
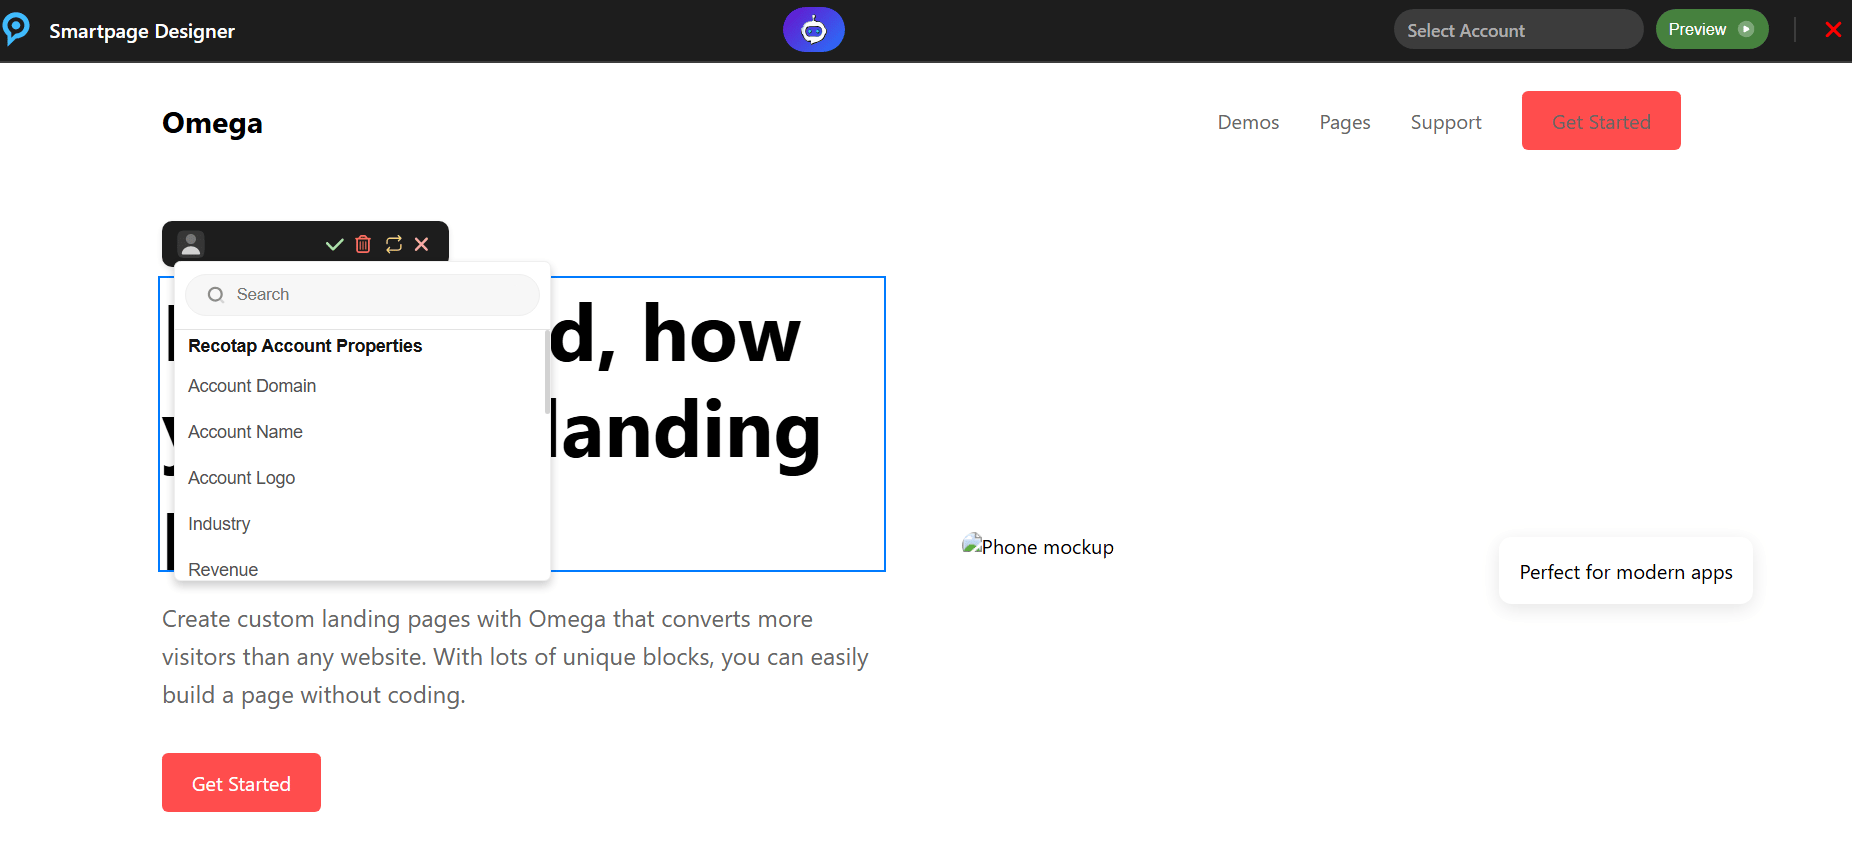
* In the designer, click any text or media block you want to personalize.
* Insert dynamic placeholders using **Recotap Account Properties**.
* For example, a placeholder like `{{company.name}}` dynamically displays the specific company name for each account.
* Click **✔ Save** after editing every placeholder.
* Use **🔄 Refresh** to redo a change and **🗑 Delete** to remove a placeholder.
## **5. Finalizing the Page**
* Preview the Smart Page by selecting an account from the top preview dropdown.
* Review, adjust, and **Save** all changes.
* Close the designer and click **Publish** to make the page live.
* If you edit later, remember to **Publish Changes**—otherwise, they’ll remain as “Unpublished Changes.”
* From the 3-dot menu, you can **Edit** or **Archive** your Smart Page.
Important Notes
* **Smart Page URLs must be unique.**
Creating multiple pages with the same URL will cause the latest one to override the others.
* **Smart Pages are independent of other modules.**
Any custom field created inside a Smart Page remains exclusive to that page and will not appear in Accounts or Ad Personalisation.
* **You can add multiple segments to a single Smart Page.**
If different segments should experience the same landing page personalization, they can all point to the same Smart Page.
For more consultation, please reach out to support at [support@recotap.com](mailto:support@recotap.com)
 * Navigate to the **Smart Pages** section in the Recotap platform.
* On the Overview page, view the performance metrics of previously created Smart Pages.
* Use the sidebar’s **Smart Pages** tab to view, manage, and create pages, which includes:
* Name
* Status (Active/Draft)
* Views
* Conversions
* Last Published Date
* Creator's Name
## **2. Creating a Smart Page**
* Click **Create Page** to begin.
* Fill in the required details:
* **Smart Page Name**: A descriptive name for easy identification.
* **Website URL**: Specify the URL where the Smart Page will be hosted.
* **Account Source**: Select accounts manually or from predefined segments.
* Navigate to the **Smart Pages** section in the Recotap platform.
* On the Overview page, view the performance metrics of previously created Smart Pages.
* Use the sidebar’s **Smart Pages** tab to view, manage, and create pages, which includes:
* Name
* Status (Active/Draft)
* Views
* Conversions
* Last Published Date
* Creator's Name
## **2. Creating a Smart Page**
* Click **Create Page** to begin.
* Fill in the required details:
* **Smart Page Name**: A descriptive name for easy identification.
* **Website URL**: Specify the URL where the Smart Page will be hosted.
* **Account Source**: Select accounts manually or from predefined segments.
 ## **3. Adding Personalization Content**
Enrich each target account with personalized data.
* Use the **Personalisation Token** dropdown to add the columns you want -such as *Industry, Use Case, Persona, Custom Message, Header Text,* and more.
* Every column you add becomes a variable that can be inserted into your Smart Page content.
* You can fill these values manually, **upload a CSV**, or use **Errors & Blanks** to quickly spot missing data before publishing.
* Once all required fields are added and populated, click **Next** to move to Personalised Rules.
## **3. Adding Personalization Content**
Enrich each target account with personalized data.
* Use the **Personalisation Token** dropdown to add the columns you want -such as *Industry, Use Case, Persona, Custom Message, Header Text,* and more.
* Every column you add becomes a variable that can be inserted into your Smart Page content.
* You can fill these values manually, **upload a CSV**, or use **Errors & Blanks** to quickly spot missing data before publishing.
* Once all required fields are added and populated, click **Next** to move to Personalised Rules.
 * For example, a placeholder like `{{company.name}}` dynamically displays the specific company name for each account.
* Click **✔ Save** after editing every placeholder.
* Use **🔄 Refresh** to redo a change and **🗑 Delete** to remove a placeholder.
## **5. Finalizing the Page**
* Preview the Smart Page by selecting an account from the top preview dropdown.
* Review, adjust, and **Save** all changes.
* For example, a placeholder like `{{company.name}}` dynamically displays the specific company name for each account.
* Click **✔ Save** after editing every placeholder.
* Use **🔄 Refresh** to redo a change and **🗑 Delete** to remove a placeholder.
## **5. Finalizing the Page**
* Preview the Smart Page by selecting an account from the top preview dropdown.
* Review, adjust, and **Save** all changes.
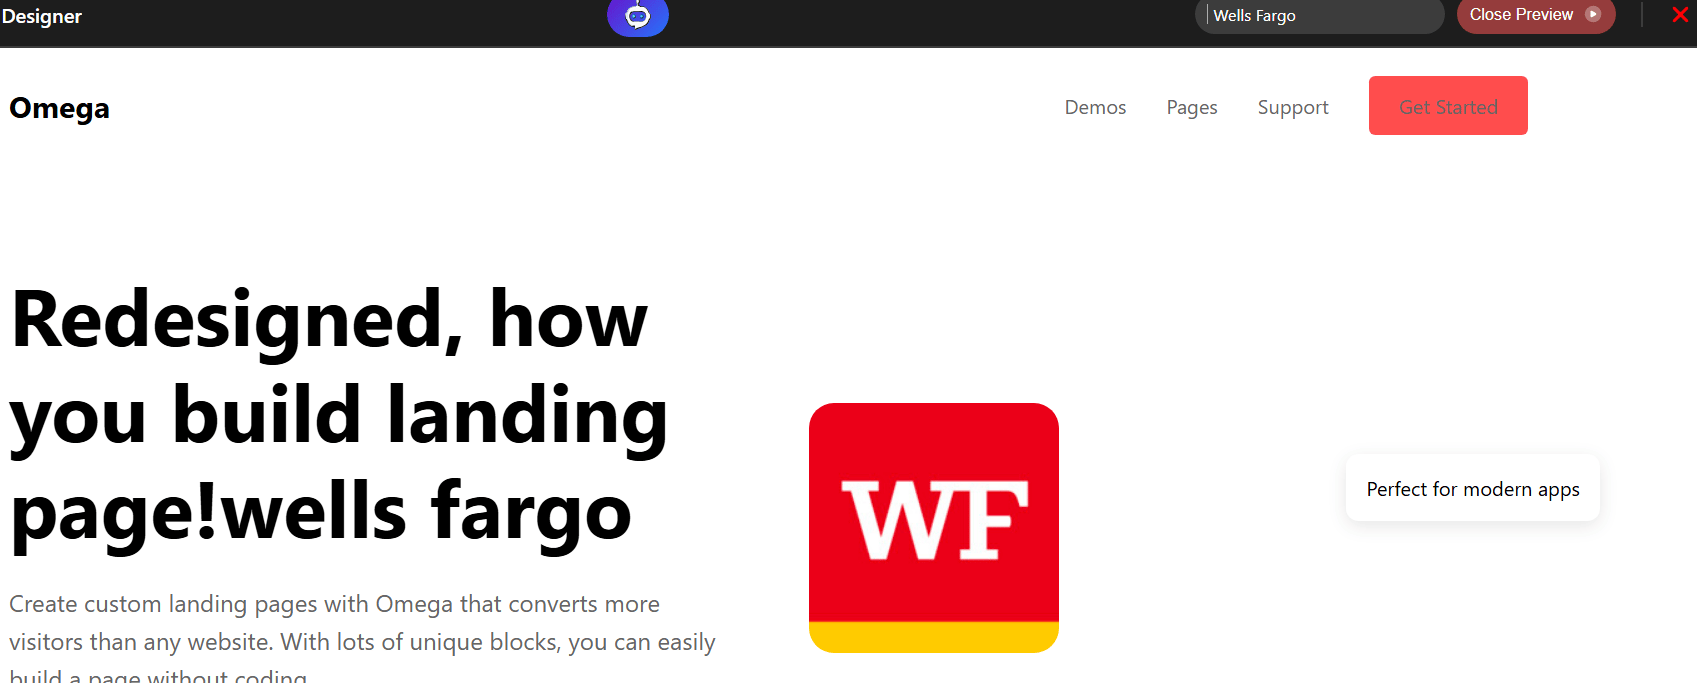 * Close the designer and click **Publish** to make the page live.
* If you edit later, remember to **Publish Changes**—otherwise, they’ll remain as “Unpublished Changes.”
* From the 3-dot menu, you can **Edit** or **Archive** your Smart Page.
* Close the designer and click **Publish** to make the page live.
* If you edit later, remember to **Publish Changes**—otherwise, they’ll remain as “Unpublished Changes.”
* From the 3-dot menu, you can **Edit** or **Archive** your Smart Page.