> ## Documentation Index
> Fetch the complete documentation index at: https://helpcenter.recotap.com/llms.txt
> Use this file to discover all available pages before exploring further.
# Launch your 1st Campaign
> Create, configure, review, and activate your first campaign in Recotap.
export const SupademoEmbed = ({src, title = "Watch interactive guide"}) => {
const [show, setShow] = useState(false);
if (!show) {
return
;
}
return ;
};
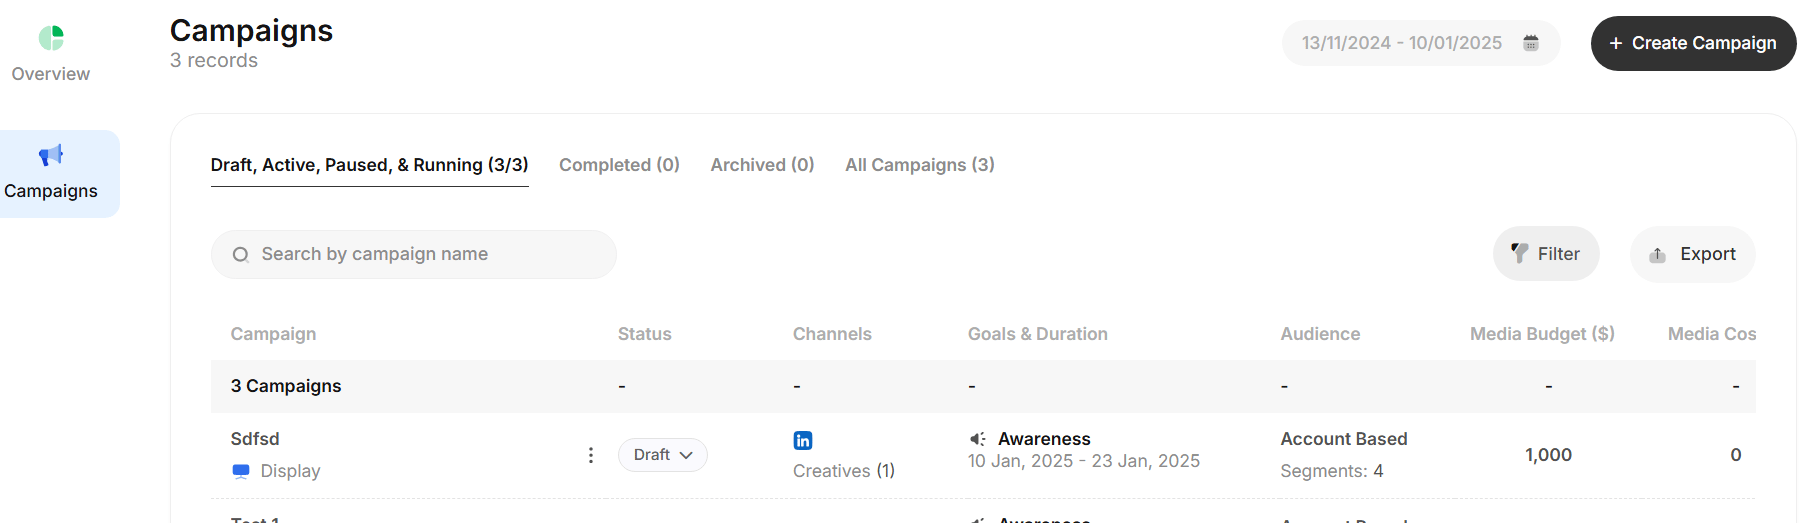
## Understanding the Tabs in a Campaign Dashboard
* **Draft, Active, Paused & Running**: Displays all campaigns in progress or not yet launched.
* **Completed**: Campaigns that have reached their end date.
* **Archived**: Campaigns that are no longer active but stored for reference.
* **All Campaigns**: Consolidates campaigns across all statuses for an overview.
* **Columns in Campaign List**:
* **Campaign**: Names of campaigns, categorized by type (e.g., Display, Video).
* **Status**: Current state of the campaign:
* *Draft*: Campaign yet to launch.
* *Active*: Campaign enabled for approval & set to run.
* *Running:* Campaign currently running.
* *Paused*: Campaign temporarily stopped.
* **Channels**: Platforms where the campaign is active (e.g., LinkedIn).
* **Goals & Duration**: Campaign objectives (e.g., website visits, form fills) and the active time period.
* **Audience**: The segmentation criteria for targeting (e.g., account-based, segments).
* **Media Budget (\$)**: Total allocated budget for the campaign.
* **Media Cost (\$)**: Actual expenditure incurred.
* **Impressions**: Total views generated by the campaign.
* **Clicks**: Engagement through ad clicks.
* **Search and Filters**:
* **Search**: Locate specific campaigns by name.
* **Filter**: Narrow down campaigns based on ad format, status, channels, goal, or users who created it.
* **Export Functionality**:
* Export campaign data for reporting or sharing with stakeholders.
* **Create Campaign**:
* Use the **+ Create Campaign** button to start building a new campaign.
## Create your Campaign
Best practices to start a campaign in Recotap:
* Ensure that your **target audience** aligns with your campaign goals.
* Regularly monitor campaign performance through the **Campaign Dashboard**.
* Use advanced settings like **Campaign Group Budget Control** for cost efficiency.
Below is a step-by-step guide for the campaign creation process. Also Creating, Editing or Cloning a Campaign:
## **Step 1: Starting a New Campaign**
1. **Access the Campaign Dashboard**:
* Click the **+ Create Campaign** button on the top-right of the campaign dashboard.
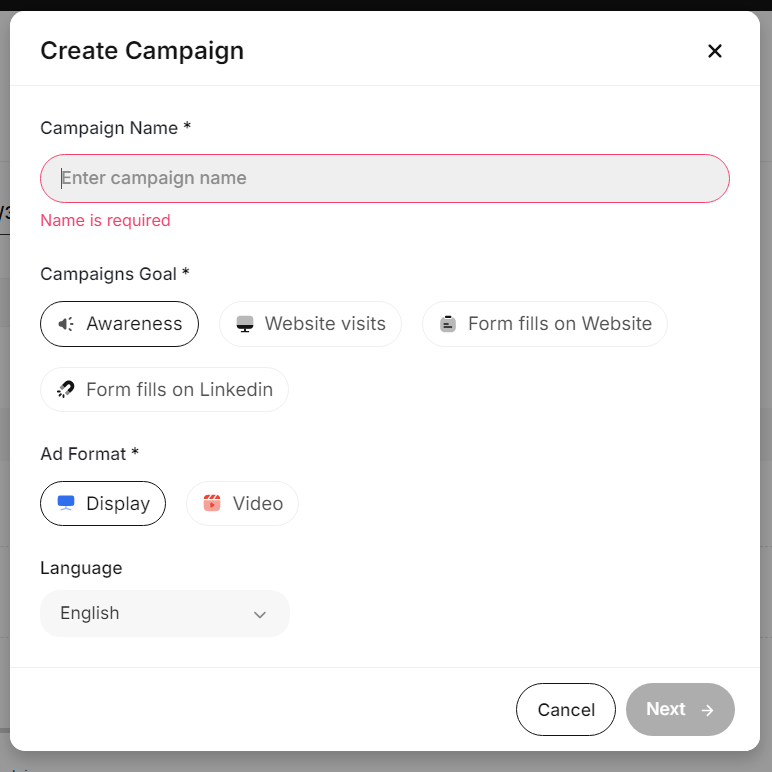
2. **Fill in Basic Campaign Details**:
* **Campaign Name**: Enter a unique, descriptive name for the campaign. *(Required)*
* **Campaign Goal**:
* Choose from:
* **Awareness** (e.g., brand visibility).
* **Website Visits** (drive traffic).
* **Form Fills on LinkedIn** (lead generation).
* **Form Fills on Website** (conversion).
* **Ad Format**: Select the format of your ads:
* **Display** (static or image-based ads).
* **Video** (dynamic or video ads).
* **Language**: Specify the language for the campaign.
3. **Proceed to Configure**:
* Click **Next** to advance to the configuration stage.
## **Step 2: Configuring the Campaign**
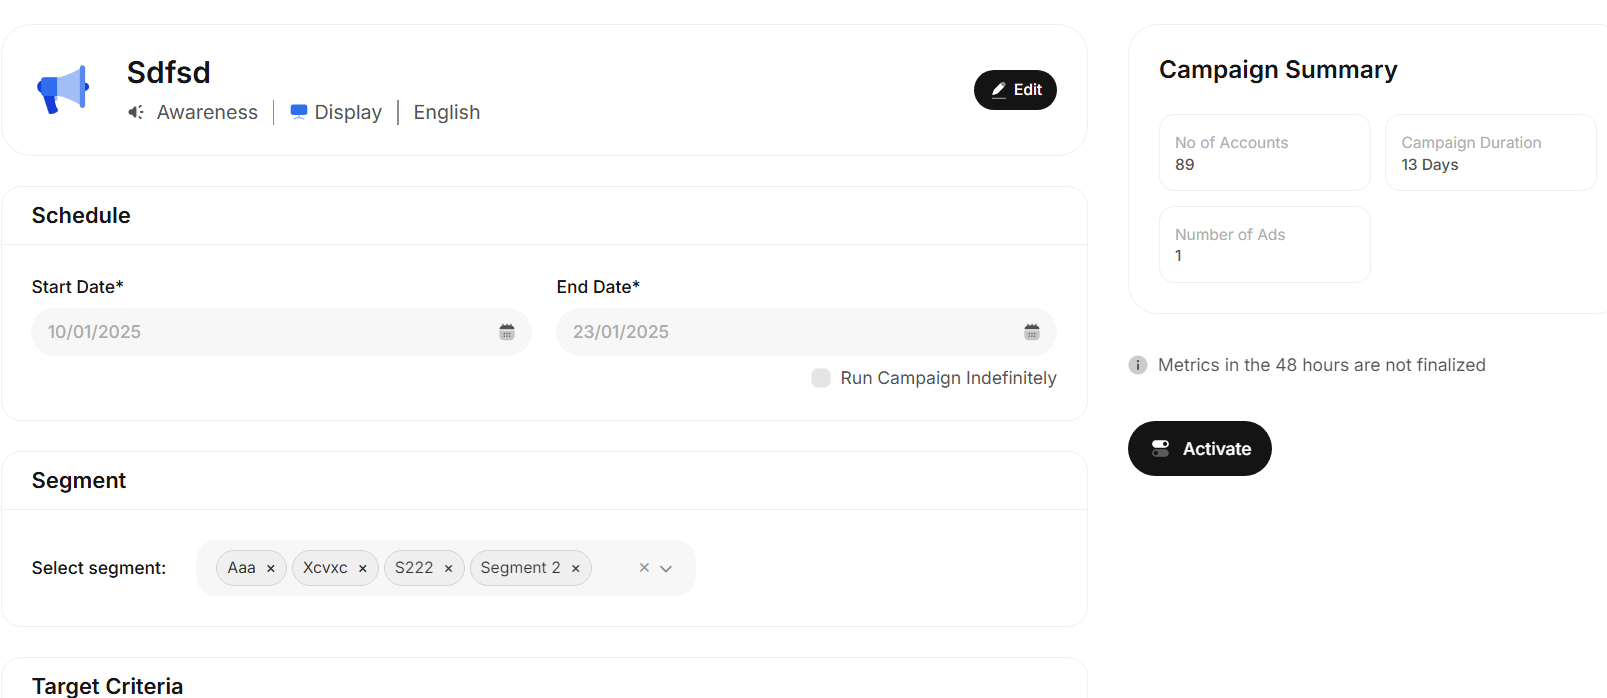
1. **Set Campaign Schedule**:
* Define the **Start Date** and **End Date** for your campaign.
* Optionally, select **Run Campaign Indefinitely** if there is no fixed end date.
2. **Target Audience**:
* **Select Segment**: Choose from pre-defined account segments.
* **Target Criteria**:
* Build a custom audience by selecting **departments and roles** or **Job Titles.**
* You can choose to add Personas that you have created within the platform based on Department & Seniority or Job Titles.
* OR you can add both of them.
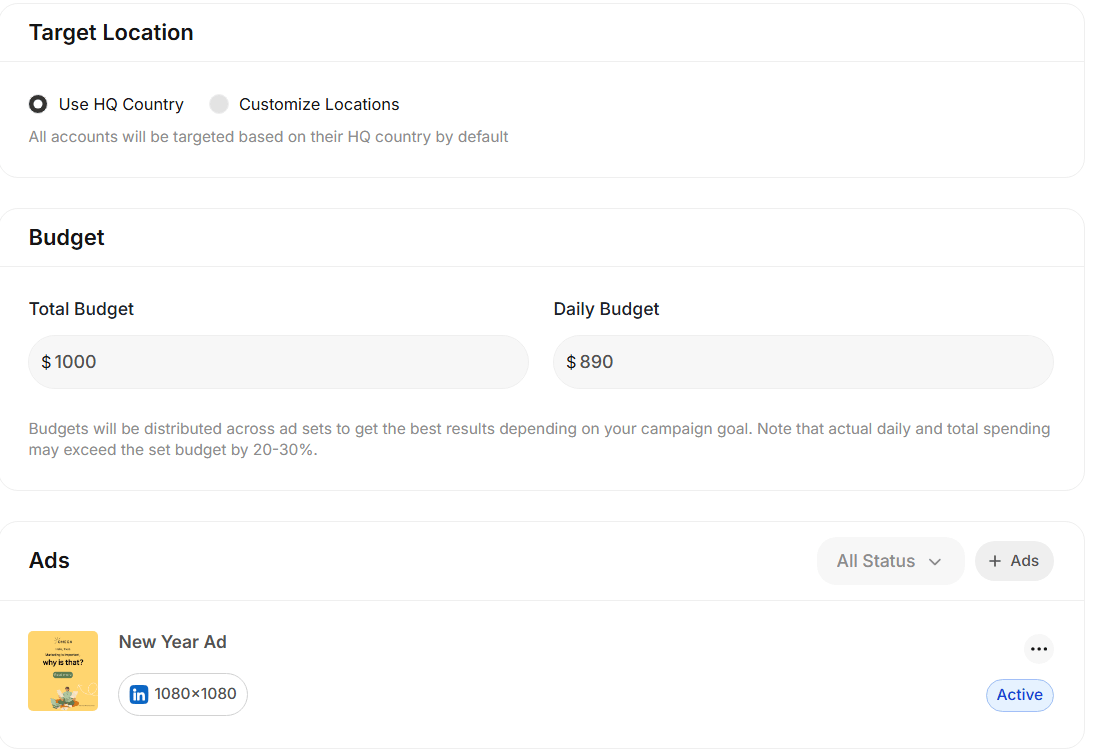
3. **Set Target Location**:
* Choose between:
* **Use HQ Country** (default targeting to account headquarters).
* **Customize Locations** (specify custom geographical areas).
* To have both, use Customize locations & click on ‘Add accounts HQ Country’ check box too at the end.
4. **Budget Allocation**:
* **Total Budget**: Define the overall spending limit for the campaign.
* **Daily Budget**: Specify a daily spend cap for better control over costs.
5. **Ad Creatives**:
* Add at least one creative (image or video) to the campaign to proceed.
## **Step 3: Advanced Settings**
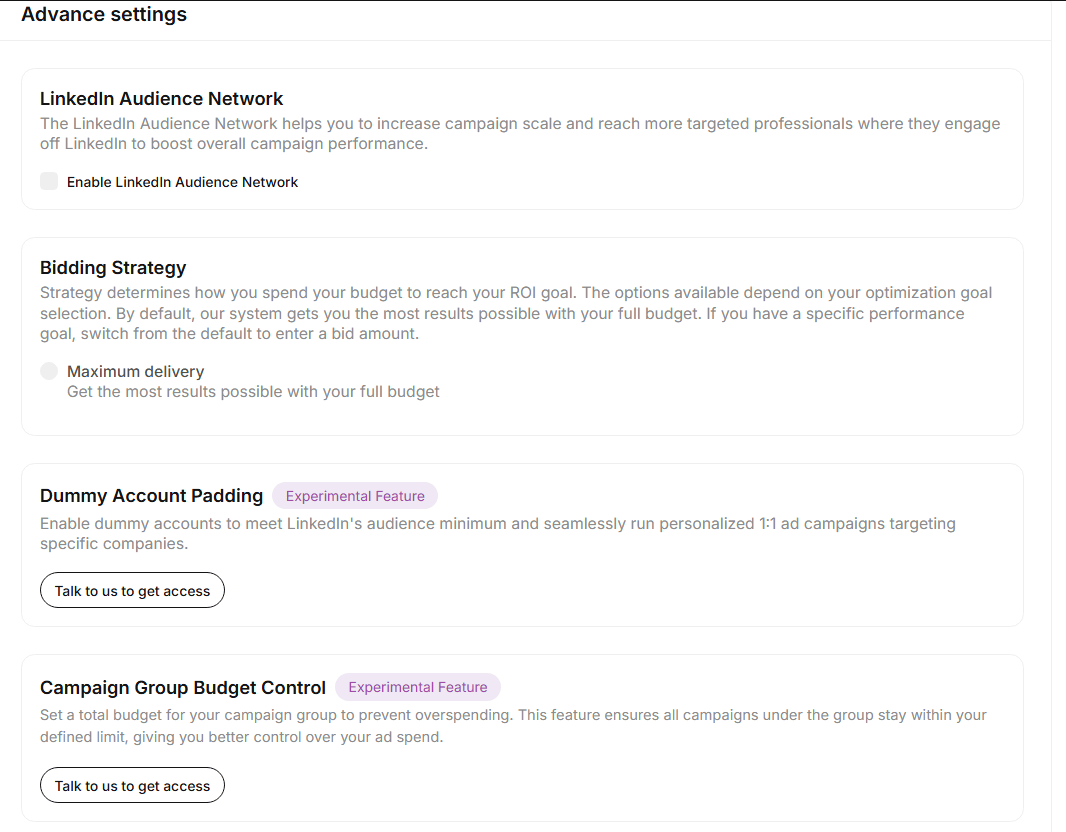
1. **LinkedIn Audience Network**:
* Expand campaign reach by enabling the **LinkedIn Audience Network** to engage professionals off LinkedIn.
2. **Bidding Strategy**:
* Choose how to spend your budget for maximum ROI:
* **Maximum Delivery**: Use the full budget for the most results.
3. **Dummy Account Padding**:
* Talk to us to enable this option to meet LinkedIn’s minimum audience requirements and maintain campaign eligibility.
4. **Campaign Group Budget Control**:
* Talk to us to set a budget limit across multiple campaigns in a group to prevent overspending.
## **Step 4: Reviewing and Activating the Campaign**
**Account Summary:** You can view the account summary i.e. number of accounts targeted, no. of creatives attached, campaign duration for the particular campaign on the right hand side of the page.
**Activate Campaign**:
* Once all configurations are complete, click **Activate** to launch the campaign.
* Alternatively, save the campaign as a draft for later refinement.
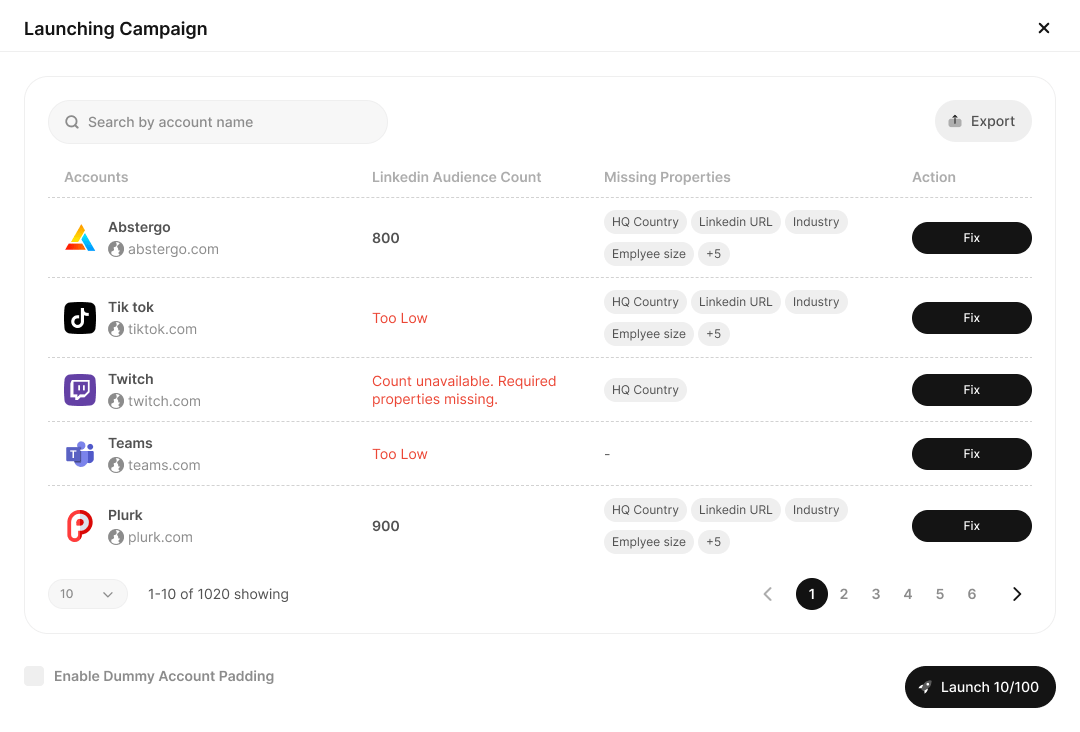
**Launching Campaign:** Post activating a campaign, \*\*\*\*the screen displays a summary of accounts involved in the campaign, focusing on their readiness and audience match levels. Here's an explanation of the key elements:
1. **Account Name and Domain:**
* Each account included in the campaign is listed with its name and corresponding domain for identification.
2. **LinkedIn Audience Count:**
* Indicates the estimated size of the matched audience on LinkedIn for each account.
* If the audience size is marked as **"Too low,"** it means there are insufficient users matching the targeting criteria for that account. This could be due to overly narrow filters.
* You can choose to add the Dummy account feature or broaden the targeting criteria to get a match.
3. **Missing Properties:**
* Highlights gaps in account details that are necessary for proper targeting, such as missing key fields (e.g., HQ location, LinkedIn page Id, etc.).
* Accounts with incomplete data can be resolved by clicking the **Fix** button against it. You need to add the required fields & update.
4. **Export Option:**
* The **Export** button allows downloading this summary for analysis, enabling users to review issues offline, avoid visiting multiple pages to identify gaps and address the same before campaign execution.
5. **Launch Summary:**
* The button at the bottom, labeled **Launch X/Y**, shows the number of accounts ready for activation (X) versus the total accounts in the campaign (Y).
* Clicking "Launch" activates the campaign for all accounts that meet the minimum criteria for targeting, while excluding those with insufficient matches or missing properties.
This screen ensures transparency and provides an opportunity to refine account details or adjust targeting to maximize campaign effectiveness.
## Editing a Campaign
1. **Access the Edit Option**:
* Navigate to the campaign dashboard.
* Locate the campaign you want to modify in the list.
* Click the three-dot menu (⋮) beside the campaign name.
* Select **Edit**.
2. **Editable Fields**:
* **Creatives**: You can add new ads & only deactivate the existing ads in an active campaign. In draft mode, you can delete the ads too.
* **Audience**: Refine targeting criteria or accounts.
* **Duration**: You can change the time frame in a draft status. In an active campaign, only the end date is changeable.
* **Budget & Costs**: Reallocate media budget or view updated expenditures.
* **Location**: Add or change location anytime.
* **Advanced Settings**: You can enable or disable or keep it unchecked.
3. **Save Changes**:
* All edits are auto saved, click **Activate** to update the live campaign.
## Cloning a Campaign
1. **Access the Clone Option**:
* Navigate to the campaign dashboard.
* Locate the campaign you want to clone in the list.
* Click the three-dot menu (⋮) beside the campaign name.
* Select **Clone**.
2. **What Happens When You Clone**:
* Creates a duplicate of the original campaign.
* The cloned campaign retains:
* Ad format and goals that can’t be changed.
* All other fields that are editable.
3. **Use Cases or Benefits of Cloning**:
* **A/B Testing**: Duplicate a campaign to test variations in creatives or targeting.
* **Scaling**: Use successful campaign configurations as a template for new campaigns targeting different segments.
* **Saves efforts:** Duplicate campaigns for different target audiences or a minor modification without starting from scratch.
 ## Create your Campaign
Best practices to start a campaign in Recotap:
* Ensure that your **target audience** aligns with your campaign goals.
* Regularly monitor campaign performance through the **Campaign Dashboard**.
* Use advanced settings like **Campaign Group Budget Control** for cost efficiency.
## Create your Campaign
Best practices to start a campaign in Recotap:
* Ensure that your **target audience** aligns with your campaign goals.
* Regularly monitor campaign performance through the **Campaign Dashboard**.
* Use advanced settings like **Campaign Group Budget Control** for cost efficiency.
 ## **Step 2: Configuring the Campaign**
1. **Set Campaign Schedule**:
* Define the **Start Date** and **End Date** for your campaign.
* Optionally, select **Run Campaign Indefinitely** if there is no fixed end date.
2. **Target Audience**:
* **Select Segment**: Choose from pre-defined account segments.
* **Target Criteria**:
* Build a custom audience by selecting **departments and roles** or **Job Titles.**
* You can choose to add Personas that you have created within the platform based on Department & Seniority or Job Titles.
* OR you can add both of them.
## **Step 2: Configuring the Campaign**
1. **Set Campaign Schedule**:
* Define the **Start Date** and **End Date** for your campaign.
* Optionally, select **Run Campaign Indefinitely** if there is no fixed end date.
2. **Target Audience**:
* **Select Segment**: Choose from pre-defined account segments.
* **Target Criteria**:
* Build a custom audience by selecting **departments and roles** or **Job Titles.**
* You can choose to add Personas that you have created within the platform based on Department & Seniority or Job Titles.
* OR you can add both of them.
 3. **Set Target Location**:
* Choose between:
* **Use HQ Country** (default targeting to account headquarters).
* **Customize Locations** (specify custom geographical areas).
* To have both, use Customize locations & click on ‘Add accounts HQ Country’ check box too at the end.
4. **Budget Allocation**:
* **Total Budget**: Define the overall spending limit for the campaign.
* **Daily Budget**: Specify a daily spend cap for better control over costs.
5. **Ad Creatives**:
* Add at least one creative (image or video) to the campaign to proceed.
3. **Set Target Location**:
* Choose between:
* **Use HQ Country** (default targeting to account headquarters).
* **Customize Locations** (specify custom geographical areas).
* To have both, use Customize locations & click on ‘Add accounts HQ Country’ check box too at the end.
4. **Budget Allocation**:
* **Total Budget**: Define the overall spending limit for the campaign.
* **Daily Budget**: Specify a daily spend cap for better control over costs.
5. **Ad Creatives**:
* Add at least one creative (image or video) to the campaign to proceed.
 ## **Step 3: Advanced Settings**
1. **LinkedIn Audience Network**:
* Expand campaign reach by enabling the **LinkedIn Audience Network** to engage professionals off LinkedIn.
2. **Bidding Strategy**:
* Choose how to spend your budget for maximum ROI:
* **Maximum Delivery**: Use the full budget for the most results.
3. **Dummy Account Padding**:
* Talk to us to enable this option to meet LinkedIn’s minimum audience requirements and maintain campaign eligibility.
4. **Campaign Group Budget Control**:
* Talk to us to set a budget limit across multiple campaigns in a group to prevent overspending.
## **Step 3: Advanced Settings**
1. **LinkedIn Audience Network**:
* Expand campaign reach by enabling the **LinkedIn Audience Network** to engage professionals off LinkedIn.
2. **Bidding Strategy**:
* Choose how to spend your budget for maximum ROI:
* **Maximum Delivery**: Use the full budget for the most results.
3. **Dummy Account Padding**:
* Talk to us to enable this option to meet LinkedIn’s minimum audience requirements and maintain campaign eligibility.
4. **Campaign Group Budget Control**:
* Talk to us to set a budget limit across multiple campaigns in a group to prevent overspending.
 ## **Step 4: Reviewing and Activating the Campaign**
**Account Summary:** You can view the account summary i.e. number of accounts targeted, no. of creatives attached, campaign duration for the particular campaign on the right hand side of the page.
**Activate Campaign**:
* Once all configurations are complete, click **Activate** to launch the campaign.
* Alternatively, save the campaign as a draft for later refinement.
**Launching Campaign:** Post activating a campaign, \*\*\*\*the screen displays a summary of accounts involved in the campaign, focusing on their readiness and audience match levels. Here's an explanation of the key elements:
## **Step 4: Reviewing and Activating the Campaign**
**Account Summary:** You can view the account summary i.e. number of accounts targeted, no. of creatives attached, campaign duration for the particular campaign on the right hand side of the page.
**Activate Campaign**:
* Once all configurations are complete, click **Activate** to launch the campaign.
* Alternatively, save the campaign as a draft for later refinement.
**Launching Campaign:** Post activating a campaign, \*\*\*\*the screen displays a summary of accounts involved in the campaign, focusing on their readiness and audience match levels. Here's an explanation of the key elements:
 1. **Account Name and Domain:**
* Each account included in the campaign is listed with its name and corresponding domain for identification.
2. **LinkedIn Audience Count:**
* Indicates the estimated size of the matched audience on LinkedIn for each account.
* If the audience size is marked as **"Too low,"** it means there are insufficient users matching the targeting criteria for that account. This could be due to overly narrow filters.
* You can choose to add the Dummy account feature or broaden the targeting criteria to get a match.
3. **Missing Properties:**
* Highlights gaps in account details that are necessary for proper targeting, such as missing key fields (e.g., HQ location, LinkedIn page Id, etc.).
* Accounts with incomplete data can be resolved by clicking the **Fix** button against it. You need to add the required fields & update.
4. **Export Option:**
* The **Export** button allows downloading this summary for analysis, enabling users to review issues offline, avoid visiting multiple pages to identify gaps and address the same before campaign execution.
5. **Launch Summary:**
* The button at the bottom, labeled **Launch X/Y**, shows the number of accounts ready for activation (X) versus the total accounts in the campaign (Y).
* Clicking "Launch" activates the campaign for all accounts that meet the minimum criteria for targeting, while excluding those with insufficient matches or missing properties.
This screen ensures transparency and provides an opportunity to refine account details or adjust targeting to maximize campaign effectiveness.
## Editing a Campaign
1. **Access the Edit Option**:
* Navigate to the campaign dashboard.
* Locate the campaign you want to modify in the list.
* Click the three-dot menu (⋮) beside the campaign name.
* Select **Edit**.
2. **Editable Fields**:
* **Creatives**: You can add new ads & only deactivate the existing ads in an active campaign. In draft mode, you can delete the ads too.
* **Audience**: Refine targeting criteria or accounts.
* **Duration**: You can change the time frame in a draft status. In an active campaign, only the end date is changeable.
* **Budget & Costs**: Reallocate media budget or view updated expenditures.
* **Location**: Add or change location anytime.
* **Advanced Settings**: You can enable or disable or keep it unchecked.
3. **Save Changes**:
* All edits are auto saved, click **Activate** to update the live campaign.
## Cloning a Campaign
1. **Access the Clone Option**:
* Navigate to the campaign dashboard.
* Locate the campaign you want to clone in the list.
* Click the three-dot menu (⋮) beside the campaign name.
* Select **Clone**.
2. **What Happens When You Clone**:
* Creates a duplicate of the original campaign.
* The cloned campaign retains:
* Ad format and goals that can’t be changed.
* All other fields that are editable.
3. **Use Cases or Benefits of Cloning**:
* **A/B Testing**: Duplicate a campaign to test variations in creatives or targeting.
* **Scaling**: Use successful campaign configurations as a template for new campaigns targeting different segments.
* **Saves efforts:** Duplicate campaigns for different target audiences or a minor modification without starting from scratch.
1. **Account Name and Domain:**
* Each account included in the campaign is listed with its name and corresponding domain for identification.
2. **LinkedIn Audience Count:**
* Indicates the estimated size of the matched audience on LinkedIn for each account.
* If the audience size is marked as **"Too low,"** it means there are insufficient users matching the targeting criteria for that account. This could be due to overly narrow filters.
* You can choose to add the Dummy account feature or broaden the targeting criteria to get a match.
3. **Missing Properties:**
* Highlights gaps in account details that are necessary for proper targeting, such as missing key fields (e.g., HQ location, LinkedIn page Id, etc.).
* Accounts with incomplete data can be resolved by clicking the **Fix** button against it. You need to add the required fields & update.
4. **Export Option:**
* The **Export** button allows downloading this summary for analysis, enabling users to review issues offline, avoid visiting multiple pages to identify gaps and address the same before campaign execution.
5. **Launch Summary:**
* The button at the bottom, labeled **Launch X/Y**, shows the number of accounts ready for activation (X) versus the total accounts in the campaign (Y).
* Clicking "Launch" activates the campaign for all accounts that meet the minimum criteria for targeting, while excluding those with insufficient matches or missing properties.
This screen ensures transparency and provides an opportunity to refine account details or adjust targeting to maximize campaign effectiveness.
## Editing a Campaign
1. **Access the Edit Option**:
* Navigate to the campaign dashboard.
* Locate the campaign you want to modify in the list.
* Click the three-dot menu (⋮) beside the campaign name.
* Select **Edit**.
2. **Editable Fields**:
* **Creatives**: You can add new ads & only deactivate the existing ads in an active campaign. In draft mode, you can delete the ads too.
* **Audience**: Refine targeting criteria or accounts.
* **Duration**: You can change the time frame in a draft status. In an active campaign, only the end date is changeable.
* **Budget & Costs**: Reallocate media budget or view updated expenditures.
* **Location**: Add or change location anytime.
* **Advanced Settings**: You can enable or disable or keep it unchecked.
3. **Save Changes**:
* All edits are auto saved, click **Activate** to update the live campaign.
## Cloning a Campaign
1. **Access the Clone Option**:
* Navigate to the campaign dashboard.
* Locate the campaign you want to clone in the list.
* Click the three-dot menu (⋮) beside the campaign name.
* Select **Clone**.
2. **What Happens When You Clone**:
* Creates a duplicate of the original campaign.
* The cloned campaign retains:
* Ad format and goals that can’t be changed.
* All other fields that are editable.
3. **Use Cases or Benefits of Cloning**:
* **A/B Testing**: Duplicate a campaign to test variations in creatives or targeting.
* **Scaling**: Use successful campaign configurations as a template for new campaigns targeting different segments.
* **Saves efforts:** Duplicate campaigns for different target audiences or a minor modification without starting from scratch.