> ## Documentation Index
> Fetch the complete documentation index at: https://helpcenter.recotap.com/llms.txt
> Use this file to discover all available pages before exploring further.
# Setup Website Intent
> Install the Recotap pixel and configure account identification and consent behavior.
export const SupademoEmbed = ({src, title = "Watch interactive guide"}) => {
const [show, setShow] = useState(false);
if (!show) {
return
;
}
return ;
};
## Setup Website Intent
The **Website Pixel** is a crucial JavaScript code snippet that enables advanced features such as **Landing Page Personalization** and **Website Visit Tracking**.
## **Why connecting your Website to Recotap is Recommended?**
1. **Landing Page Personalization**:
* The pixel enables dynamic content customization tailored to your target audience.
* Without the pixel, personalized user experiences and targeted messaging cannot be achieved.
2. **Website Visit Tracking**:
* The pixel captures visitor activities and behavior, providing valuable data for:
* Account-Level Intent Detection
* Lead Scoring & Qualification
* Segment Accounts Based on Behavior
* Trigger Retargeting Ads by Page-Level Interest Mapping
* Sales Team Navigation
## **Use Cases of Website Visits Tracking:**
1. If a target account visits key pages like pricing, product, or case studies, that's a strong buying signal. You can flag that account as high-priority in your CRM or route it to sales for immediate follow-up.
2. Personalize future messaging, email nurtures, and ads based on what they're reading. Basically, cluster accounts by the type of content they're consuming.
3. Launch account-based retargeting campaigns based on page visits by mapping which accounts are visiting specific pages
4. Track which pages are most visited by high-value accounts over time. Optimize those pages for conversion or create more content around them.
## **Steps to Add the Website Pixel**
### **Manually (Most Popular):**
1. Navigate to **Settings** >> **Workspace** >> **Tech Settings**
2. Copy the Pixel Code:
* Click the **Copy** button next to the pixel code in the platform to easily copy the snippet.
3. Insert the Code into Your Website:
* Paste the code snippet between the `` and `` tags on every page of your website or landing pages.
* This ensures the pixel is active across all required pages for comprehensive tracking and personalization.
4. **Verify the Installation**:
* Once the code is added, return to the platform and click the **Verify Now** button to confirm successful installation.
Need an interactive guide to add the Website Pixel?
### Via Google Tag Manager (GTM):
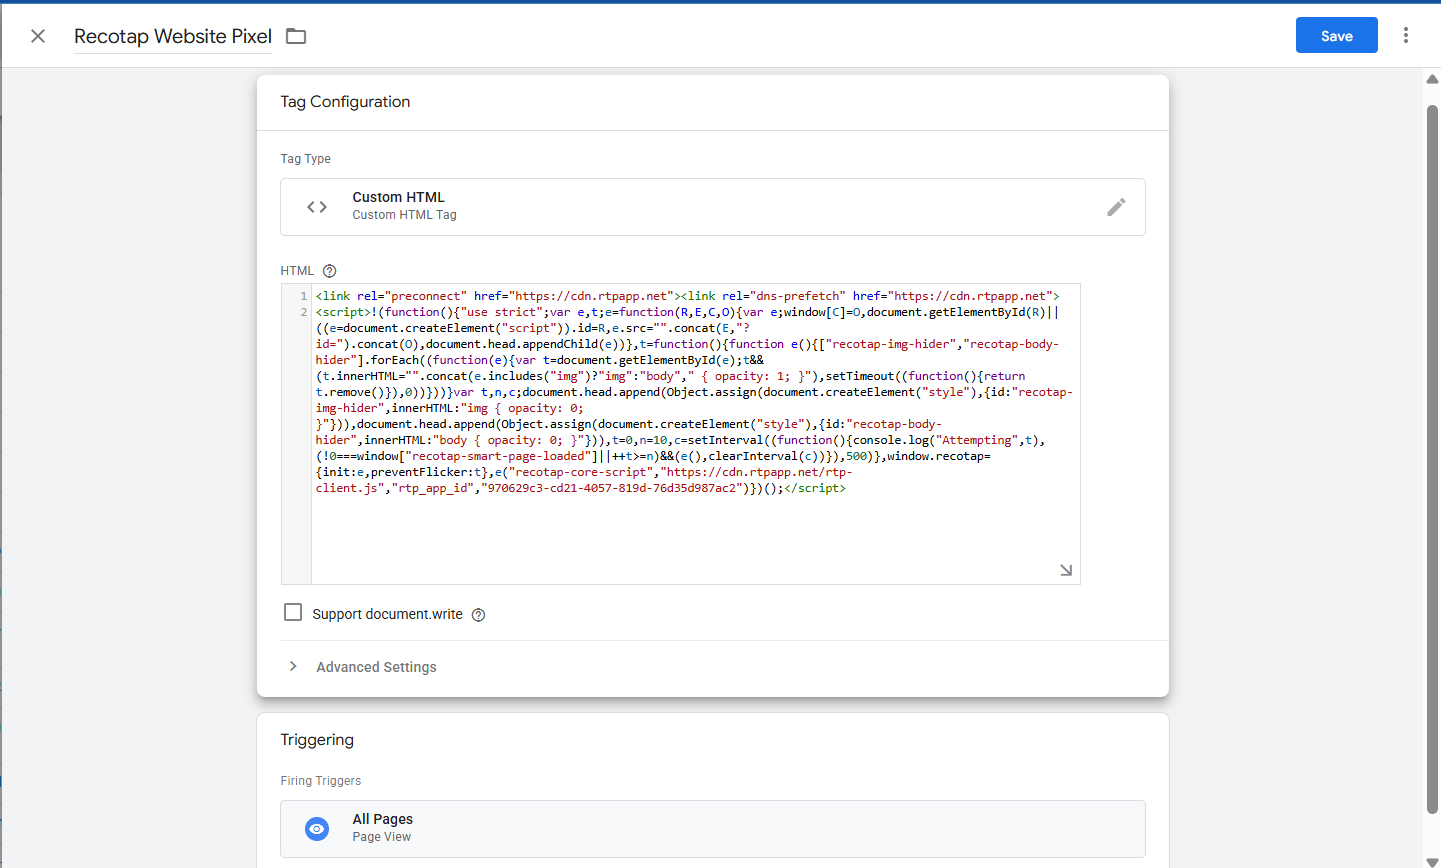
You can also add the Recotap SDK directly through GTM, eliminating the need for coding. Here’s how -
1. Open your GTM dashboard
2. Click on **Tags** → **New**
3. Choose **Tag Configuration** → Select **Custom HTML**
4. Paste the Recotap Pixel script into the HTML box
5. Under **Triggering**, select **All Pages**
6. Click **Save** and **Publish** the container
After adding the script, go to your Recotap account **Tech Settings** page and click **Verify** to confirm successful installation.
### Via WordPress Website:
**Option 1: Using a Plugin (Recommended for Non-Developers)**
1. **Login** to your WordPress admin panel.
2. Go to **Plugins → Add New**.
3. Search for **“Insert Headers and Footers”** by WPBeginner (or any similar plugin).
4. Click **Install Now**, then **Activate**.
5. Go to **Settings → Insert Headers and Footers**.
6. **Paste the Recotap pixel script** into the **Scripts in Header** section.
7. Click **Save**.
This will add the pixel to the `` section of all pages.
**Option 2: Add directly to header.php (For Advanced Users)**
8. From the WordPress admin, go to **Appearance → Theme File Editor**.
9. On the right, click on **header.php**.
10. Paste the Recotap pixel script just **before the closing `` tag**.
11. Click **Update File**.
**Note**: This method should only be used if you’re familiar with editing theme files.
## **Consent Management**
If you’re using cookies on your website, you'll be responsible for requesting user consent in compliance with the CCPA and GDPR before setting any cookies other than those deemed strictly necessary for site operation.
There are two ways to collect customer consent - opt-out or opt-in. The preferred method is opt-out so that visitors can receive personalized experiences on their first page view, without seeing the page content visibly change or refresh, and to maximize the number of visitors seeing personalized experiences.
### **Opt-out**
This is the preferred implementation method. The default implementation of the Recotap script will automatically opt users into tracking.
The opt-out method of implementation keeps this default in place, but allows the customer to opt out of tracking if they wish. Any opt-out action will be handled by your internal cookie consent tool, but Recotap gives you the tools to ensure a user is opted out if they choose to be.
To opt out a user, you'll want to call the below method whenever a user chooses to opt out via a cookie consent tool.
```jsx theme={null}
recotap.optOut()
```
### **Opt-in**
If you choose this option, no personalizations will be visible to your site visitors or or website visitor tracking will be enabled unless they explicitly opt-in to tracking. To enable the opt-in method, you'll need to take 2 steps.
1. Add this code below your Recotap client script so that all users that arrive on your site are automatically opted out of tracking:
```jsx theme={null}
```
2. Call this method whenever a user chooses to opt in via your cookie consent tool:
```jsx theme={null}
recotap.optIn()
```
> If you implement step 1 but not step 2, all users will be default opted out of tracking and neither the Recotap website personalization nor the website visitor tracking will work.
## Setup Account Identification
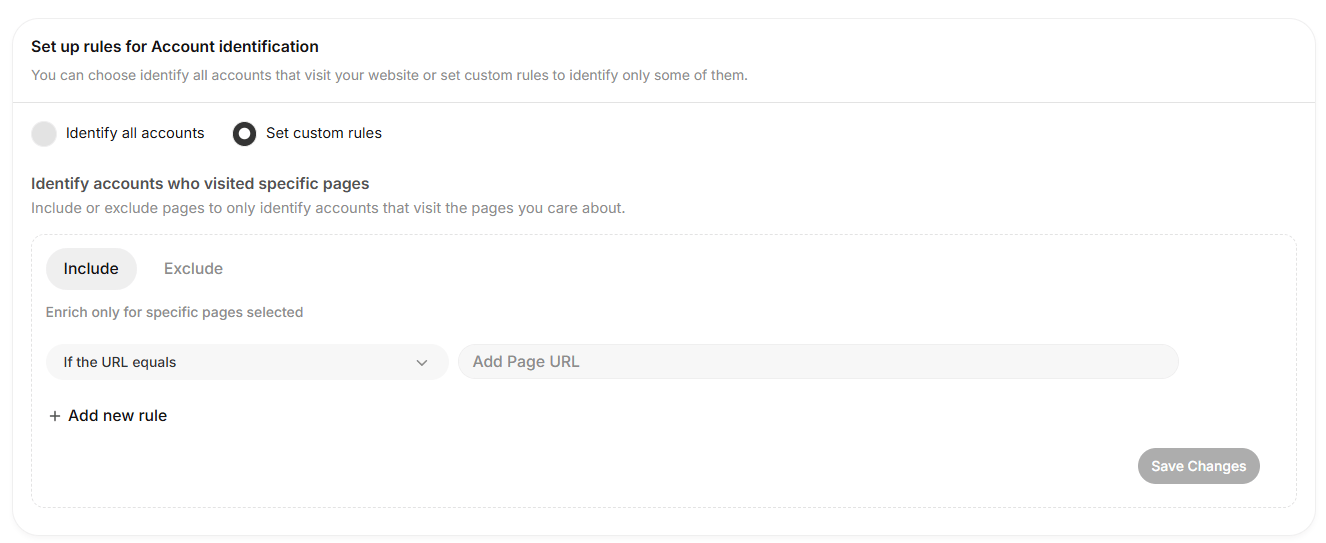
After the website tracking pixel is verified, you can set up rules for **Account Identification** to determine how accounts are tracked and identified on your website.
### Options for Account Identification:
1. **Identify All Accounts**:
* This option ensures that all accounts visiting your website are tracked and enriched.
* It is ideal if you want comprehensive tracking without excluding any visitors.
> Note: This might affect your monthly account quota, as every visit is logged.
2. **Set Custom Rules**:
* Use this option to filter and track accounts based on specific page visits.
* It allows more precise tracking by defining inclusion or exclusion rules based on URLs.
### Setting Custom Rules:
1. **Include Rules**:
* This setting allows you to track accounts only for specific pages.
* Example:
* **If the URL equals**: Enter a specific page URL (e.g., `https://example.com/pricing`).
* **If the URL contains**: Add a keyword or partial match for URLs (e.g., `pricing` or `blog`).
2. **Exclude Rules**:
* This setting lets you exclude accounts that visit certain pages from being tracked.
* Example:
* Exclude traffic from URLs like `https://example.com/internal` or pages that may not be relevant.
### How to Apply:
1. Choose the option: **Identify All Accounts** or **Set Custom Rules**.
2. If using **Set Custom Rules**:
* Click “**Specific Pages**” & define rules under **Include** or **Exclude** tabs.
* Use the drop-down menu to select conditions (**If the URL equals** or **If the URL contains**).
* Add the respective URL or keyword.
* Click **Add New Rule** to define multiple conditions to include or exclude accounts.
* Repeat this process to add additional rules.
* Click **Save Changes** after completing the rules.
This setup ensures precise account tracking, enabling you to focus on relevant visitors and optimize your ABM strategy.
 ### Via WordPress Website:
**Option 1: Using a Plugin (Recommended for Non-Developers)**
1. **Login** to your WordPress admin panel.
2. Go to **Plugins → Add New**.
3. Search for **“Insert Headers and Footers”** by WPBeginner (or any similar plugin).
4. Click **Install Now**, then **Activate**.
5. Go to **Settings → Insert Headers and Footers**.
6. **Paste the Recotap pixel script** into the **Scripts in Header** section.
7. Click **Save**.
This will add the pixel to the `` section of all pages.
**Option 2: Add directly to header.php (For Advanced Users)**
8. From the WordPress admin, go to **Appearance → Theme File Editor**.
9. On the right, click on **header.php**.
10. Paste the Recotap pixel script just **before the closing `` tag**.
11. Click **Update File**.
**Note**: This method should only be used if you’re familiar with editing theme files.
## **Consent Management**
If you’re using cookies on your website, you'll be responsible for requesting user consent in compliance with the CCPA and GDPR before setting any cookies other than those deemed strictly necessary for site operation.
There are two ways to collect customer consent - opt-out or opt-in. The preferred method is opt-out so that visitors can receive personalized experiences on their first page view, without seeing the page content visibly change or refresh, and to maximize the number of visitors seeing personalized experiences.
### **Opt-out**
This is the preferred implementation method. The default implementation of the Recotap script will automatically opt users into tracking.
The opt-out method of implementation keeps this default in place, but allows the customer to opt out of tracking if they wish. Any opt-out action will be handled by your internal cookie consent tool, but Recotap gives you the tools to ensure a user is opted out if they choose to be.
To opt out a user, you'll want to call the below method whenever a user chooses to opt out via a cookie consent tool.
```jsx theme={null}
recotap.optOut()
```
### **Opt-in**
If you choose this option, no personalizations will be visible to your site visitors or or website visitor tracking will be enabled unless they explicitly opt-in to tracking. To enable the opt-in method, you'll need to take 2 steps.
1. Add this code below your Recotap client script so that all users that arrive on your site are automatically opted out of tracking:
```jsx theme={null}
```
2. Call this method whenever a user chooses to opt in via your cookie consent tool:
```jsx theme={null}
recotap.optIn()
```
> If you implement step 1 but not step 2, all users will be default opted out of tracking and neither the Recotap website personalization nor the website visitor tracking will work.
## Setup Account Identification
After the website tracking pixel is verified, you can set up rules for **Account Identification** to determine how accounts are tracked and identified on your website.
### Options for Account Identification:
1. **Identify All Accounts**:
* This option ensures that all accounts visiting your website are tracked and enriched.
* It is ideal if you want comprehensive tracking without excluding any visitors.
> Note: This might affect your monthly account quota, as every visit is logged.
2. **Set Custom Rules**:
* Use this option to filter and track accounts based on specific page visits.
* It allows more precise tracking by defining inclusion or exclusion rules based on URLs.
### Setting Custom Rules:
1. **Include Rules**:
* This setting allows you to track accounts only for specific pages.
* Example:
* **If the URL equals**: Enter a specific page URL (e.g., `https://example.com/pricing`).
* **If the URL contains**: Add a keyword or partial match for URLs (e.g., `pricing` or `blog`).
2. **Exclude Rules**:
* This setting lets you exclude accounts that visit certain pages from being tracked.
* Example:
* Exclude traffic from URLs like `https://example.com/internal` or pages that may not be relevant.
### How to Apply:
### Via WordPress Website:
**Option 1: Using a Plugin (Recommended for Non-Developers)**
1. **Login** to your WordPress admin panel.
2. Go to **Plugins → Add New**.
3. Search for **“Insert Headers and Footers”** by WPBeginner (or any similar plugin).
4. Click **Install Now**, then **Activate**.
5. Go to **Settings → Insert Headers and Footers**.
6. **Paste the Recotap pixel script** into the **Scripts in Header** section.
7. Click **Save**.
This will add the pixel to the `` section of all pages.
**Option 2: Add directly to header.php (For Advanced Users)**
8. From the WordPress admin, go to **Appearance → Theme File Editor**.
9. On the right, click on **header.php**.
10. Paste the Recotap pixel script just **before the closing `` tag**.
11. Click **Update File**.
**Note**: This method should only be used if you’re familiar with editing theme files.
## **Consent Management**
If you’re using cookies on your website, you'll be responsible for requesting user consent in compliance with the CCPA and GDPR before setting any cookies other than those deemed strictly necessary for site operation.
There are two ways to collect customer consent - opt-out or opt-in. The preferred method is opt-out so that visitors can receive personalized experiences on their first page view, without seeing the page content visibly change or refresh, and to maximize the number of visitors seeing personalized experiences.
### **Opt-out**
This is the preferred implementation method. The default implementation of the Recotap script will automatically opt users into tracking.
The opt-out method of implementation keeps this default in place, but allows the customer to opt out of tracking if they wish. Any opt-out action will be handled by your internal cookie consent tool, but Recotap gives you the tools to ensure a user is opted out if they choose to be.
To opt out a user, you'll want to call the below method whenever a user chooses to opt out via a cookie consent tool.
```jsx theme={null}
recotap.optOut()
```
### **Opt-in**
If you choose this option, no personalizations will be visible to your site visitors or or website visitor tracking will be enabled unless they explicitly opt-in to tracking. To enable the opt-in method, you'll need to take 2 steps.
1. Add this code below your Recotap client script so that all users that arrive on your site are automatically opted out of tracking:
```jsx theme={null}
```
2. Call this method whenever a user chooses to opt in via your cookie consent tool:
```jsx theme={null}
recotap.optIn()
```
> If you implement step 1 but not step 2, all users will be default opted out of tracking and neither the Recotap website personalization nor the website visitor tracking will work.
## Setup Account Identification
After the website tracking pixel is verified, you can set up rules for **Account Identification** to determine how accounts are tracked and identified on your website.
### Options for Account Identification:
1. **Identify All Accounts**:
* This option ensures that all accounts visiting your website are tracked and enriched.
* It is ideal if you want comprehensive tracking without excluding any visitors.
> Note: This might affect your monthly account quota, as every visit is logged.
2. **Set Custom Rules**:
* Use this option to filter and track accounts based on specific page visits.
* It allows more precise tracking by defining inclusion or exclusion rules based on URLs.
### Setting Custom Rules:
1. **Include Rules**:
* This setting allows you to track accounts only for specific pages.
* Example:
* **If the URL equals**: Enter a specific page URL (e.g., `https://example.com/pricing`).
* **If the URL contains**: Add a keyword or partial match for URLs (e.g., `pricing` or `blog`).
2. **Exclude Rules**:
* This setting lets you exclude accounts that visit certain pages from being tracked.
* Example:
* Exclude traffic from URLs like `https://example.com/internal` or pages that may not be relevant.
### How to Apply:
 1. Choose the option: **Identify All Accounts** or **Set Custom Rules**.
2. If using **Set Custom Rules**:
* Click “**Specific Pages**” & define rules under **Include** or **Exclude** tabs.
* Use the drop-down menu to select conditions (**If the URL equals** or **If the URL contains**).
* Add the respective URL or keyword.
* Click **Add New Rule** to define multiple conditions to include or exclude accounts.
* Repeat this process to add additional rules.
* Click **Save Changes** after completing the rules.
This setup ensures precise account tracking, enabling you to focus on relevant visitors and optimize your ABM strategy.
1. Choose the option: **Identify All Accounts** or **Set Custom Rules**.
2. If using **Set Custom Rules**:
* Click “**Specific Pages**” & define rules under **Include** or **Exclude** tabs.
* Use the drop-down menu to select conditions (**If the URL equals** or **If the URL contains**).
* Add the respective URL or keyword.
* Click **Add New Rule** to define multiple conditions to include or exclude accounts.
* Repeat this process to add additional rules.
* Click **Save Changes** after completing the rules.
This setup ensures precise account tracking, enabling you to focus on relevant visitors and optimize your ABM strategy.