> ## Documentation Index
> Fetch the complete documentation index at: https://helpcenter.recotap.com/llms.txt
> Use this file to discover all available pages before exploring further.
# Upload your Accounts
> Add target accounts manually, by file upload, or via external system sync.
export const SupademoEmbed = ({src, title = "Watch interactive guide"}) => {
const [show, setShow] = useState(false);
if (!show) {
return
;
}
return ;
};
## Upload your Accounts to Recotap
The 'Add Account' feature empowers ABM teams to expand their target account list within the platform, offering multiple methods to suit diverse operational needs.
### **Accessibility:**
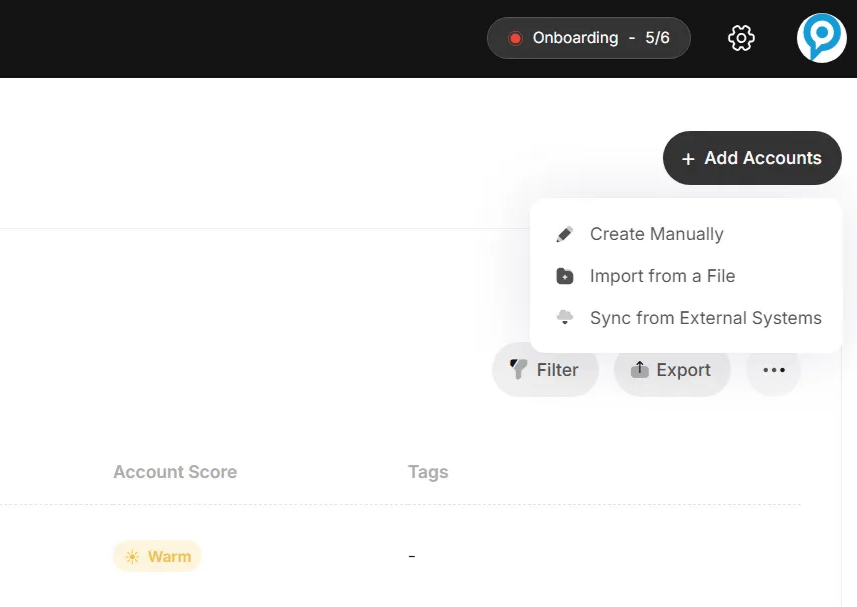
* The feature is accessible from the **Target** tab on the main account dashboard.
* The prominently placed **+ Add Account** button ensures quick and easy access for users.
### **Options for Adding Accounts:**
1. **Manual Creation**: Add high-priority accounts individually by entering account details.
2. **File Import**: Upload accounts in bulk using .CSV or .XLSX files for efficient data management.
3. **Sync External Systems**: Seamlessly integrate with CRM or external systems for dynamic account synchronization.
## Methods to Add Accounts
### **1. Manual Creation:**
Access an interactive, step-by-step guide to manually create accounts:
* **Initiate:**
Click **‘+ Add Account’** from the Account Dashboard → choose **‘Create Manually’**.
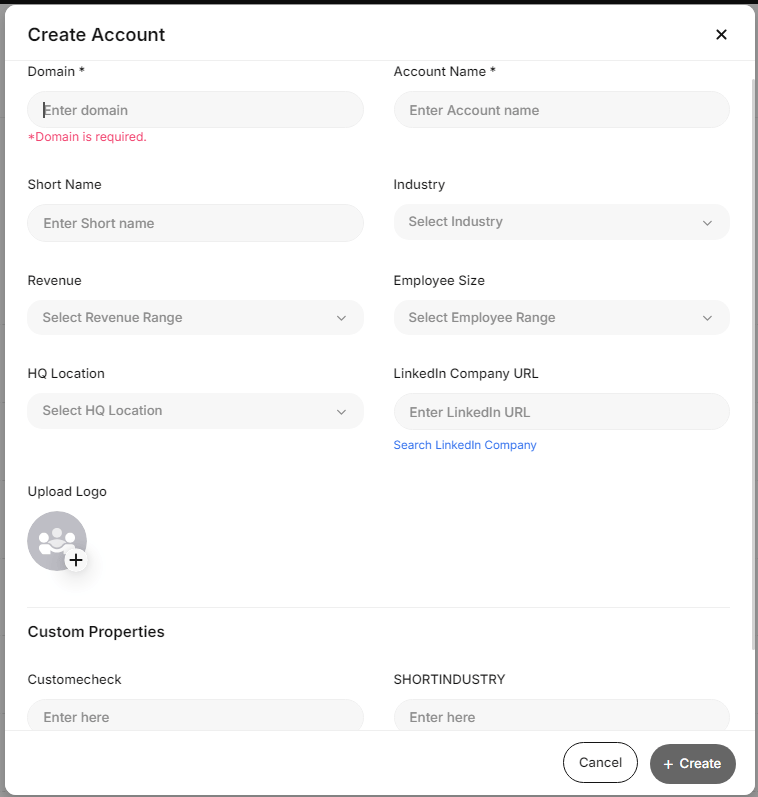
* **Required Fields:**
* **Domain:** Enter the official domain name.
* **Account Name:** Add the full legal name.
* **Additional Details:**
* **Short Name:** Common or abbreviated version (used in personalized creatives).
* **Revenue:** Select the revenue range.
* **HQ Location:** Search and set headquarters.
* **Logo:** Use **‘Upload Logo’** to add a visual identifier.
* **Custom Properties:**
Click **‘+ Add New’** to create additional fields.
* **Field Type:** Choose (text, date, number).
* **Field Label:** Name the property clearly.
* **Optional (Client-Specific) Fields:**
Lifecycle Stage • Close Date • Website URL • City • Phone Number
### **2. File Import:**
Access an interactive, step-by-step guide to file import:
* Upload a file to bulk add or update accounts.
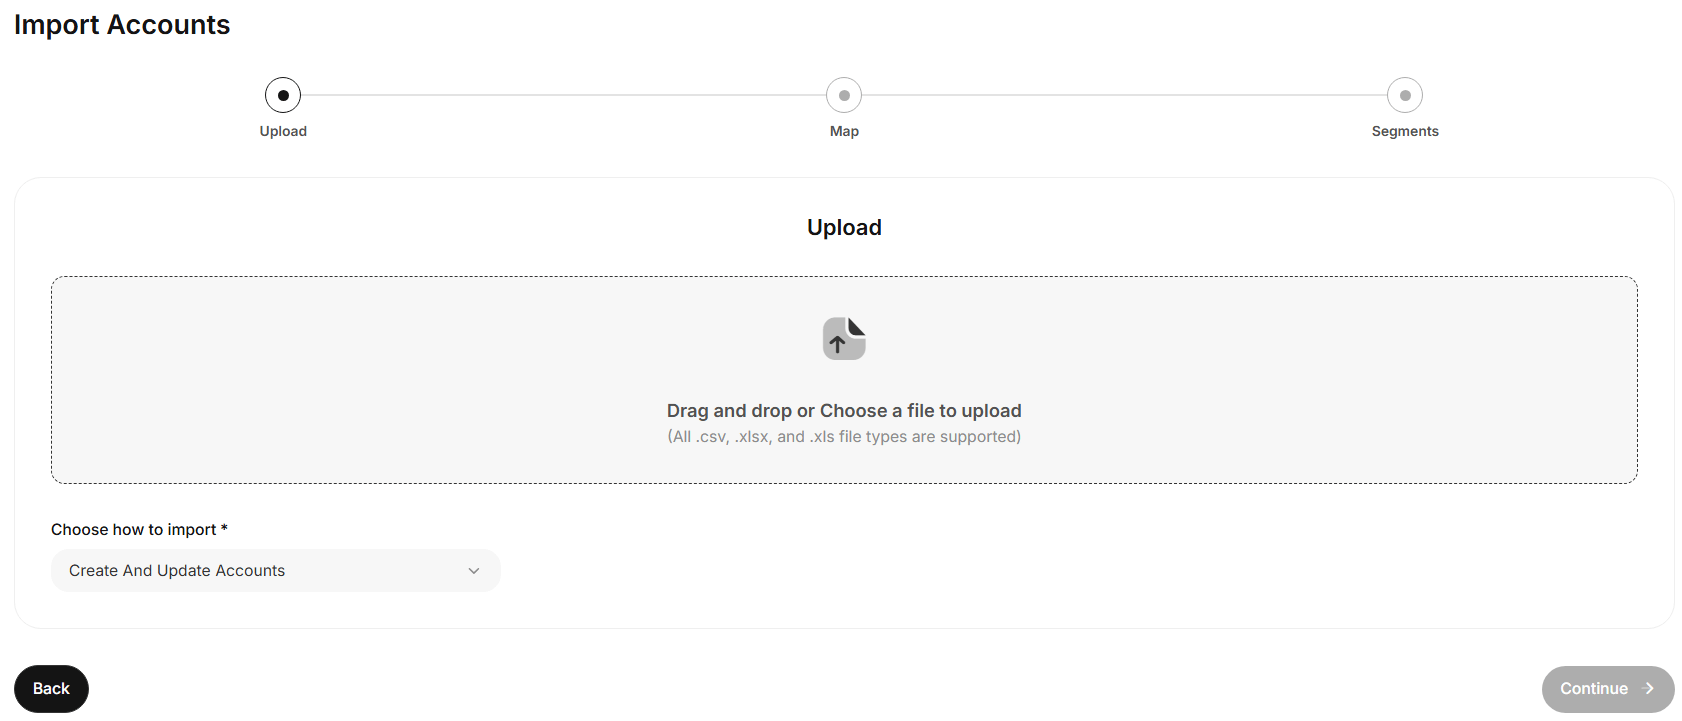
* Click **“Import from a File”** to open the Import Accounts section.
* Choose an import type: **Create**, **Update**, or **Create & Update**.
* Supported formats: **.csv, .xlsx, .xls**.
* Drag and drop or browse to upload, then map fields to Recotap properties.
### **Steps for Mapping:**
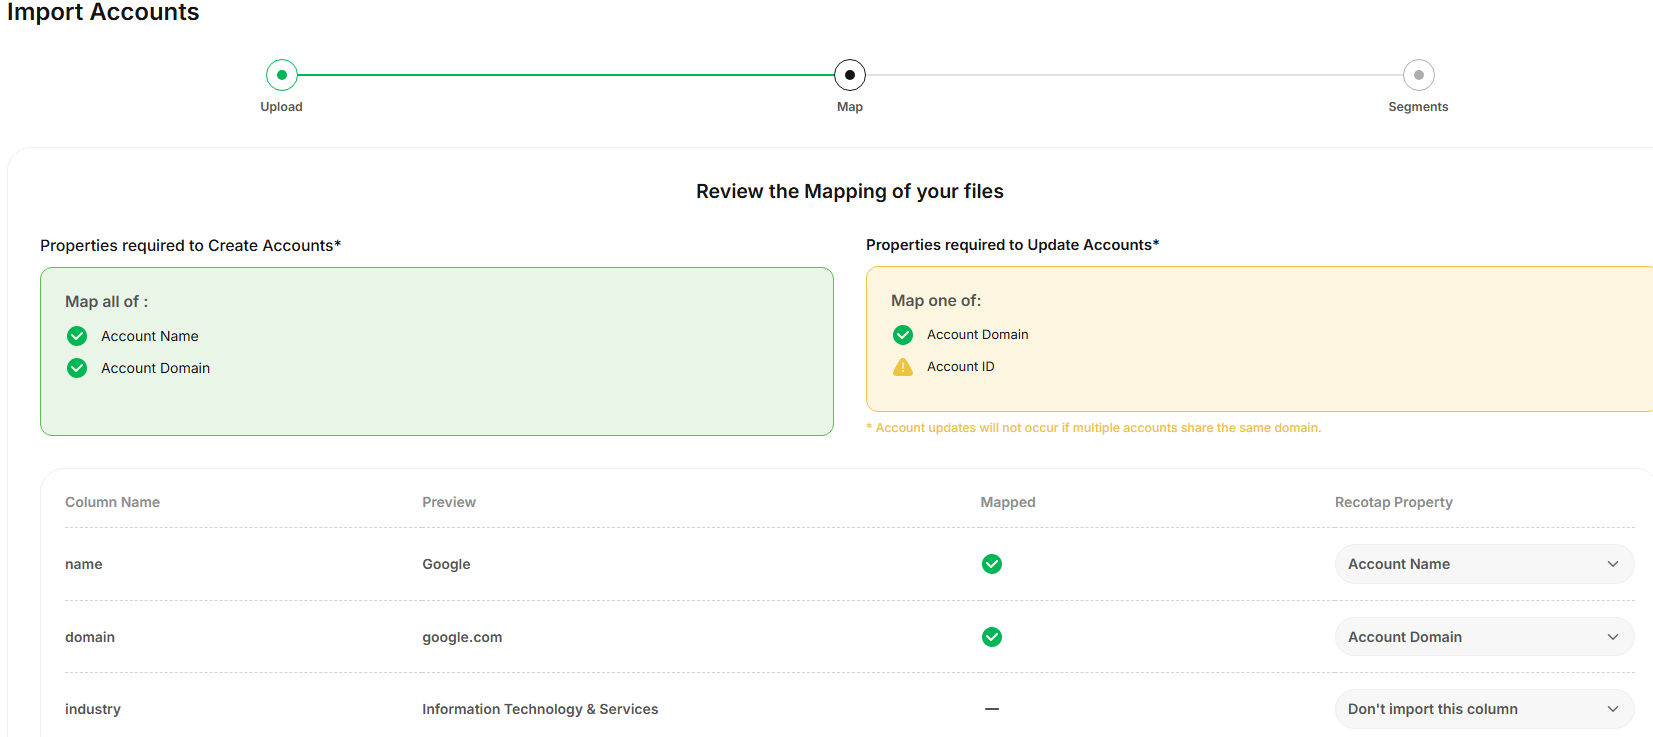
* **Identify Required Fields:**
* Map all mandatory fields (e.g., *Account Name*, *Domain*, *Account ID*) to proceed.
* **Review Columns:**
* Check uploaded column names and data preview to ensure accuracy.
* **Map Data:**
* Match each column to the right Recotap property from the dropdown.
* ✅ Green = valid mapping ❌ Red = error.
* **Fix Errors:**
* Correct mismatched fields or re-upload after adjusting data.
* **Optional Fields:**
* Map non-mandatory or custom fields as needed or skip them.
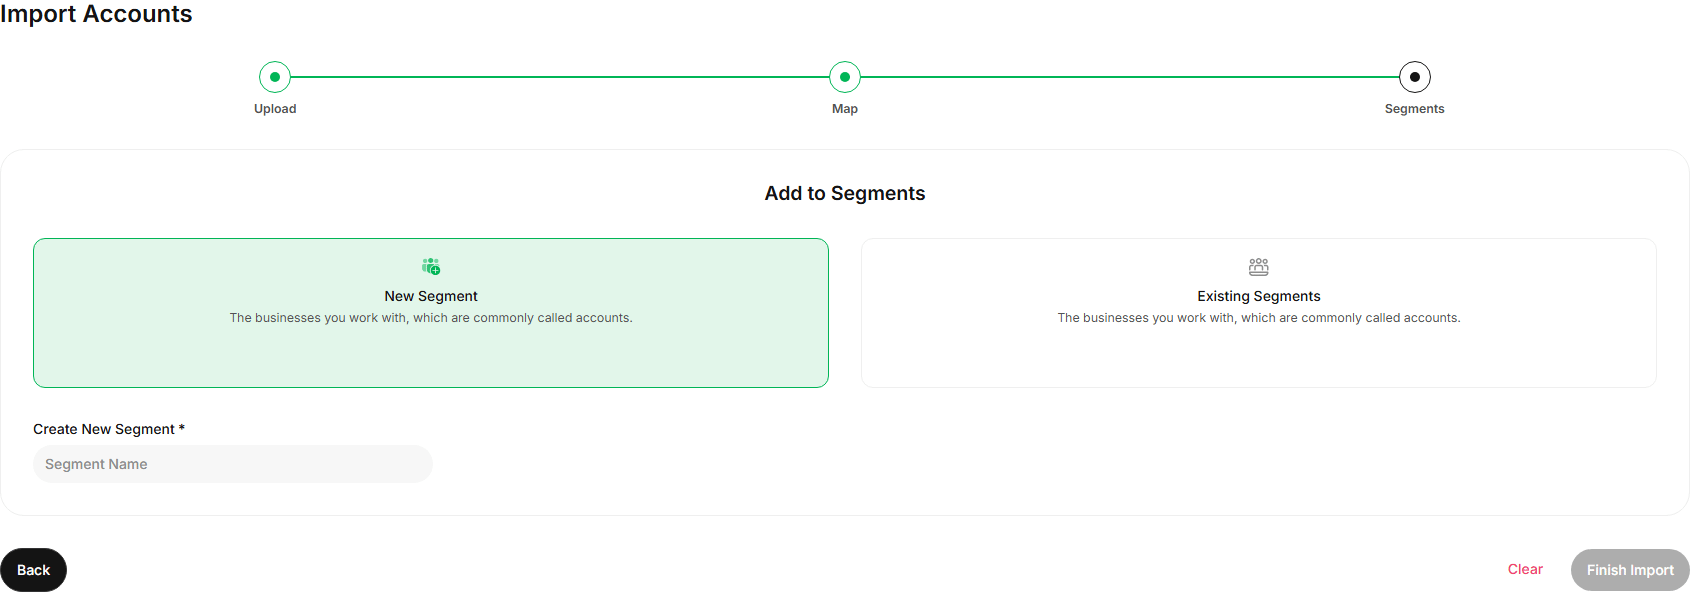
**Complete Import:**
* Proceed once mappings are done.
* Optionally, add accounts to a new or existing segment.
* Click **‘Clear’** to skip segment selection before finishing import.
### **3. Sync from External Systems:**
Access an interactive, step-by-step guide to sync accounts from your CRM account:
### **Steps to Sync Accounts**
1. **Navigate to Sync Option**:
* Go to the **Target** tab and click **Sync from External Systems**.
2. **Review Existing Rules**:
* Check previously added sync rules and details via the dashboard.
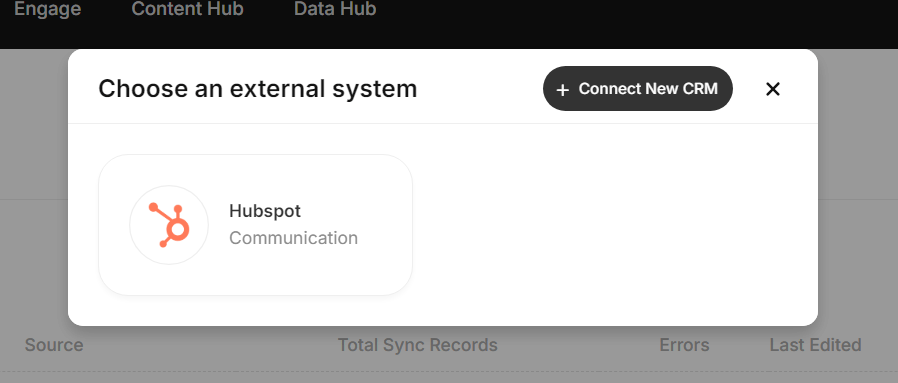
3. **Create a New Sync Rule**:
* Click **Create New Sync Rule**.
* Select the external system (e.g., HubSpot).
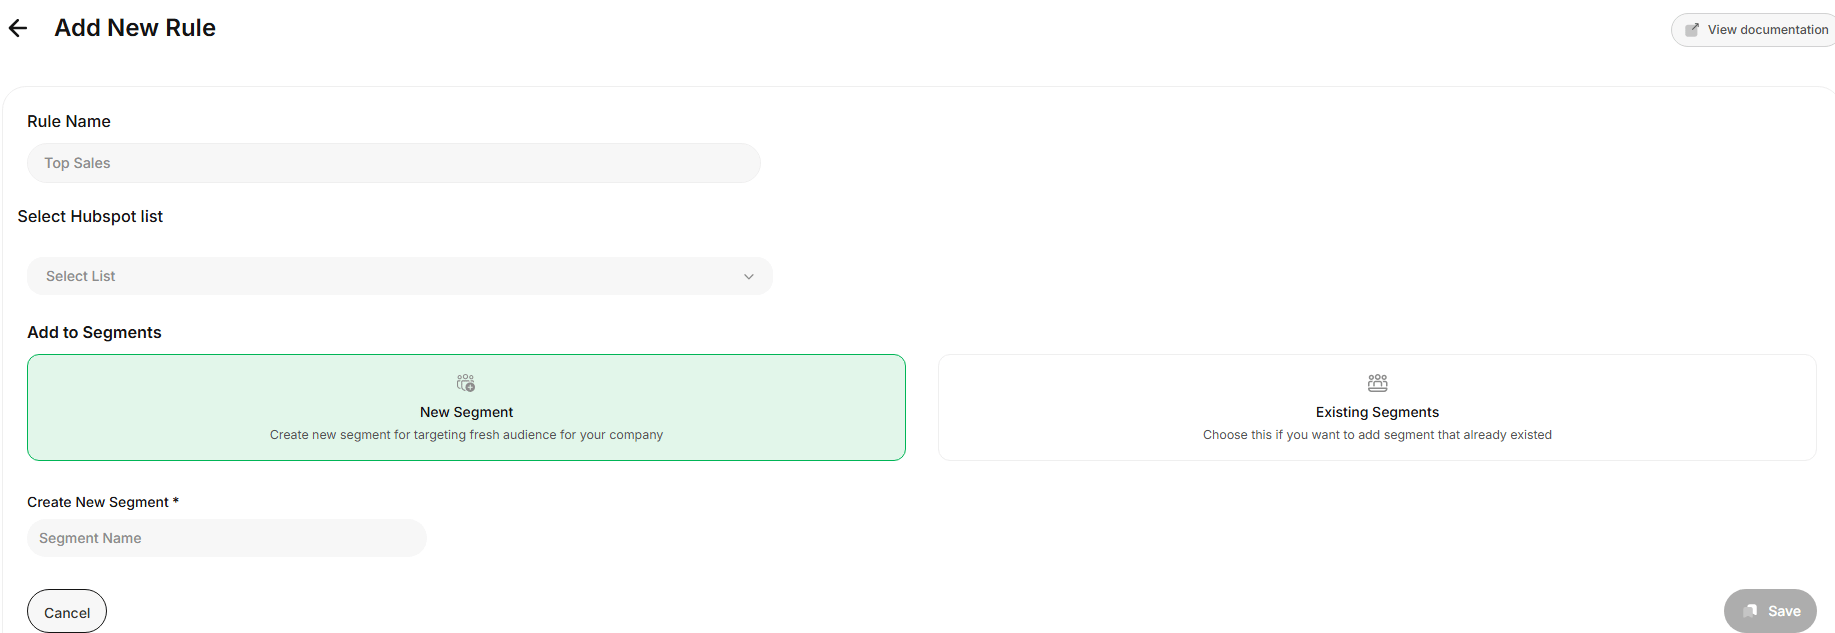
4. **Configure the Rule**:
* Add a **Rule Name** (e.g., Top Sales Accounts).
* Define a **Source**:
* **HubSpot List**: Import predefined lists from HubSpot.
* **Filter by Properties**: Dynamically filter accounts based on CRM attributes.
* Specify the **Destination**:
* **New Segment**: Create a new audience segment.
* **Existing Segment**: Add accounts to an existing segment.
5. **Save and Activate**:
* Click **Save** to finalize the sync rule.
* Data will sync automatically every 24 hours.
> **Use Case:**
By syncing **CRM Lists** or filtering by properties, you can:
* Align account targeting strategies with CRM data.
* Personalize campaigns for high-value accounts based on dynamic segments.
* Scale ABM efforts with accurate and up-to-date account data.
 ## Methods to Add Accounts
### **1. Manual Creation:**
## Methods to Add Accounts
### **1. Manual Creation:**
 ### **2. File Import:**
 ### **Steps for Mapping:**
* **Identify Required Fields:**
* Map all mandatory fields (e.g., *Account Name*, *Domain*, *Account ID*) to proceed.
* **Review Columns:**
* Check uploaded column names and data preview to ensure accuracy.
* **Map Data:**
* Match each column to the right Recotap property from the dropdown.
* ✅ Green = valid mapping ❌ Red = error.
* **Fix Errors:**
* Correct mismatched fields or re-upload after adjusting data.
* **Optional Fields:**
* Map non-mandatory or custom fields as needed or skip them.
### **Steps for Mapping:**
* **Identify Required Fields:**
* Map all mandatory fields (e.g., *Account Name*, *Domain*, *Account ID*) to proceed.
* **Review Columns:**
* Check uploaded column names and data preview to ensure accuracy.
* **Map Data:**
* Match each column to the right Recotap property from the dropdown.
* ✅ Green = valid mapping ❌ Red = error.
* **Fix Errors:**
* Correct mismatched fields or re-upload after adjusting data.
* **Optional Fields:**
* Map non-mandatory or custom fields as needed or skip them.
 **Complete Import:**
* Proceed once mappings are done.
* Optionally, add accounts to a new or existing segment.
* Click **‘Clear’** to skip segment selection before finishing import.
**Complete Import:**
* Proceed once mappings are done.
* Optionally, add accounts to a new or existing segment.
* Click **‘Clear’** to skip segment selection before finishing import.
 ### **3. Sync from External Systems:**
 4. **Configure the Rule**:
* Add a **Rule Name** (e.g., Top Sales Accounts).
* Define a **Source**:
* **HubSpot List**: Import predefined lists from HubSpot.
* **Filter by Properties**: Dynamically filter accounts based on CRM attributes.
* Specify the **Destination**:
* **New Segment**: Create a new audience segment.
* **Existing Segment**: Add accounts to an existing segment.
5. **Save and Activate**:
* Click **Save** to finalize the sync rule.
* Data will sync automatically every 24 hours.
4. **Configure the Rule**:
* Add a **Rule Name** (e.g., Top Sales Accounts).
* Define a **Source**:
* **HubSpot List**: Import predefined lists from HubSpot.
* **Filter by Properties**: Dynamically filter accounts based on CRM attributes.
* Specify the **Destination**:
* **New Segment**: Create a new audience segment.
* **Existing Segment**: Add accounts to an existing segment.
5. **Save and Activate**:
* Click **Save** to finalize the sync rule.
* Data will sync automatically every 24 hours.
 > **Use Case:**
By syncing **CRM Lists** or filtering by properties, you can:
* Align account targeting strategies with CRM data.
* Personalize campaigns for high-value accounts based on dynamic segments.
* Scale ABM efforts with accurate and up-to-date account data.
> **Use Case:**
By syncing **CRM Lists** or filtering by properties, you can:
* Align account targeting strategies with CRM data.
* Personalize campaigns for high-value accounts based on dynamic segments.
* Scale ABM efforts with accurate and up-to-date account data.